Monday, August 29, 2011

Tiny Dancer!

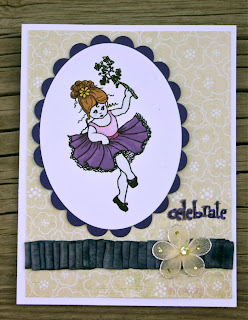
     This card was made for the progressive challenge at Crafter's Digital Art Center (CDAC - find them here)  with the freebie image by WhoopsieDaisy Digital Stamps.  I colored the stamp using Photoshop Elements. I've never colored anything using Elements before and I like how she turned out. The scalloped mat is Core'dinations and the pattern paper is from Basic Grey's Wisteria Stack.  I colored the ribbon with a Copic because I didn't have any dark enough (the color matches better than it appears in the photo, sorry the camera I usually use is in Finland with my husband.) This was the first time I tried to make a pleated ribbon (another first, this is also my first challenge ;- ) All of the tutorials I've seen have you use a hot glue gun, but I decided to try it with Aileen's Tacky glue and it worked fine. The flower is from Creative Charms, just love them.  I stamped the sentiment with Dusty Concord from Ranger and a stamp from Clear Stamps.


     I haven't finished the inside like I usually do, because I'm not sure whom I'm giving this card to. I have a friend whose birthday is coming up, that this card would be great for (ok, now that's the 2nd time I dangled a preposition, it's beginning to annoy me), but I had a different card in mind for her, before I had to finish this image for the challenge. So, maybe I'll just finish this card up for her.

     What would I do differently? Well, I meant to corner round the card, but put the ribbon on the pattern paper, before I remembered and couldn't do it then. I think that would look nice with the ruffles and the flowers. I also thought this image might look nice on a round scalloped card.

     Thanks for stopping by and spending some time with me. Please, leave a comment so that I know you were here. Take some time to be creative today! Have a wonder-filled day.

Friday, August 26, 2011

Quick note for a friend

     Well, my friends have been busy taking care of me. Two lunches out, in two days and a check up phone call from another. I almost didn't get this card done for one of them, who changed jobs, kind of, by switching as the librarian of an associated parochial school, since they closed her school this year (not the same one that I made the birthday card for). Now instead of a 5 min. commute, she has a 45 min. commute for the part-time job. So, this was a big decision and change for her (as well as the school being larger, so she has more classes). I wanted to send her a card of support. In between having lunch with her one day and lunch with a neighbor the next, I quickly put together, today's card.

I used my  Cricut Imagine and the Imagine More cart to print and cut all the images. The bird and it's wing are pop dotted. I used all of the layers on the front and added gel and glitter pens to the images to add some extra texture. I used my Fisker's cutter to trim the edge with the scallop decorative blade going back and forth to get a different edge. The sentiment is from Hero Arts and  is stamped in Chipped Sapphire by Ranger.


   The inside, is the first 2 layers from the same image as the front and I left it basically plain, to write my message. On the bottom, I stamped a bird from Hero Arts and a Bible verse from Clear Dollar Stamps, both in Chipped Sapphire.


     What could I have done differently? I should have made the notes on the front larger. I had meant to, but the first one started out small and tentative and then I was stuck >.< I wanted a bit more glitter and sparkle, but my gel pen colors matched better.  Maybe, some other glittery embellishment added on. On the inside, I thought about coloring the bird and I may still, when I write the note.

Thanks for stopping by and spending some time with me. Please, say hi, so that I know you were here. Exercise your creative muscle today!

Tuesday, August 23, 2011

Back to the beach ;- )

     Sorry, I've been AWOL again. I've had some cluster headache issues and I have gotten my son back to college. I thought I had a great early start on today's card, when I started it last week.  Good thing, because I ended coming down to the wire. This card is for a good friend for whom I volunteered, when my son went to K- 8th grade. She was and is a Lutheran School librarian. I also volunteered for her predecessor, before I was pregnant. Ruth likes lighthouses, so I used the one from Cricut's Life's a Beach cartridge as my main image.  The white is Walmart cardstock and the blue is Core'dinations (like the texture.) The layers didn't cut as I would have expected and the white left spaces, so I re-cut the image a bit bigger and used those white cut outs popped up on the original frame. I used a gem for the light. The waves are a border feature cut of the wave image also from Life's a Beach. I used my Gypsy to set up the cut so that the white stripes would appear at the tops of the waves. The seagulls are the shifted cut from the lighthouse image. I edged them with a sharpie. The sentiment stamp is from the Scrappy Cat set  called Cardmaker's Dream. I hand wrote her name. I think the colors would also work well for a guy card with a less scripty (I know it's not really a word) font for the sentiment.


     The sentiment on the inside was done digitally and the font is Apple Casual. The elements were also cut from Life's a Beach. I edged the bottom layer of the pelican with a grey Copic marker to help him stand out where his head is above the blue. I also popped up his wing. The pier piling was inked with Ranger Tea Dye Ink. The bottom was sponged with Ranger Tumbled Glass and I used the negative of a scalloped oval cut I had to mask the top of the area, moving it around as I sponged, just to give a background for the images, mainly, because the pelican was white. I used a brown sharpie at the bottom of the images to ground them.


     All in all, I was very happy with the way this card turned out. What would I do differently? I might have popped up the seagulls. I debated a bit with myself about that one and then just glued them flat. I might have also given them eyes. I couldn't remember if you can see there eyes at that distance and didn't bother to go and look it up. I'm guessing you probably can. I should have used Swiss Dots on the brown bottom of the front. So, those are some things that could probably make the card better.

Thanks for dropping by and I'll try to be more consistent in my posting. Sept. is a busy card month, so I should have a lot to post. I have been practicing my doodling and drawing ( just cartoons ;- ) but that's creative growth for me, lol. Though these aren't things I would post. Please, leave me a comment, so that  I know that you were here. Have a week of fun and creativity!

Monday, August 15, 2011

A day at the beach!

     Today's card is for a friend's daughter, who went to school with my son from Kindergarten through 8th grade. She turned 19 on Friday and my son turned 20 on Saturday. Us moms have become great friends, we are very much alike, and they have also remained friends. I knew she had plans to go with friends to spend the weekend at the beach, so that was how I themed, my card. The weather forecast may have other plans however, so I began to hope my card wouldn't make her sad >.<

     I used Cricut's Life's a Beach cart and cut the card option for the lifeguard chair image.  Knowing I'd see, at least her parents for my son's birthday, I made a large card 7 x 11.75 (before folding). I then used the Gypsy to make a layer from the lifeguard chair image. The proportion weren't correct, so I used a separate layer and de-selected the keep proportions key. I then sized the height and width separately through trial and error until it matched up with the one from the card option (6.10 width and 6.5 height). I used Scattered Straw Distress Stickles to simulate sand and tried to make the lifeguard chair look a bit realistic, with some sand on it as well. I edged the brown part of the chair with copics.  I embossed the red layer of the umbrella with swiss dots and popped it up in the center, gluing down the sides and top edges. I added red and white twine from My Mind's Eye. The pattern background paper is Neptunes Wrath by Reminisce that I picked up at Archiver (it's 2-sided as you will see from the inside photo. ) The label was cut from Just Because Cards. It's the Shift key of the main key for the "Corny" card, believe it or not, but I liked the shape and thought it would make a good label. It's used as a vertical panel on the card, so I just turned it and cut it, at I believe, 2.5 inches. It's stamped with Clear Stamps in Mementos and I added two red brads.


     The sentiment on the inside was done digitally and the fonts are Beach and Handwriting- Dakota. I cut the beach ball and the sandals both from Life's a Beach. The red on the beach ball was embossed using Tim Holts's Fades Folder Regal Flourishes. The pattern paper was a scrap and I'm afraid I don't know what it is. I almost didn't have enough and was worried, because I loved it for the base of the sandals.


     I like how this card turned out. I'm not sure about the sand on the chair steps or not, but I didn't like the starkness of it either. I love the look of the pattern paper and the sandals. So, all in all I'm happy with it.

     I hope you got a chance to snap up some deals at Menards this weekend. I meant to post about them (with the rebate, which is a store credit, basically you could get Cricut mats and carts for under $5), but with my son's birthday, I'm sorry I just didn't get it posted ;- ( I did get 2 sets of mats and 3 carts though. I figured we would use the store checks to buy driveway and deck sealant. I thought the sale was only for 2 days, but the coupon says it was for a whole 3 days.

     Thanks for stopping by and I'll try to better better about posting info like the sale, when I know it. Please, leave a comment so that I know you stopped by. It really means a lot to know you were here. Have a creativity filled week.

Friday, August 5, 2011

Creating the Mystical Unicorn

     Today's card is for a little girl who is turning 5. Her favorite animal is the unicorn, so I decided to make it a shaped card. I used the unicorn from the  Cricut Paper Dolls Dress-Up cart. It's from the page with the pixi, I believe it's the 13th image. You're saying pixi? I know that's what I said, but I was just glad to have a unicorn. (I, too, thought it would be with the princess.) I used my Gypsy to make it a shaped card welding two unicorns (one flipped) with a small rectangle from Accent Essentials. I used pearlized cardstock  from Crafter's Companion, for the base because they have a nice sturdy cardstock (love this stuff) and I thought the pearlized finish made a nice card. I cut another unicorn  from white cardstock (hiding the eye cut - because I was going to use the gem, and some other cuts - I would have the Cricut draw) and before removing the mat (using the Gypsy) selected return to program, selected the parts I wanted drawn, replaced the blade with the Cri-Kits gel pen and selected cut again and added the lines to the unicorn. I re-cut part of the unicorn again using scrap paper with black Core'dinations where the hooves would be cut and stopped it after it cut the hooves. I was going to do the same for the horn with glitter cardstock, but decided to embossed it instead with an embossing pen and Kaleidoscope embossing powder. The mane and tail were embellished with Sparkly Fluff. I added a gem for the eye and the flower is from Creative Charms. The font is from the Storybook cart and welded on the Gypsy.

 Click photo for close-up, to see details

     I used Martha Stewart's circle cutter, to cut the circle, at 1 1/2 inches and embossed it with Divine Swirls.  I then inked it with Studio G chalk ink. The 5 was cut from the Storybook cart and they were popped up. The sentiment was made digitally and the fonts are Happy Birthday in Storybook and LD Farfetched for the rest, which is available from Lettering Delights (see the link on my sidebar - they also have graphics,  and SVG's .)  The hearts are Rain Dots from Cloud9 Design which is a Fiskers brand. and were a bit too peachy, so I colored them a bit with my Copics. The sentiment and it's mat were cut with nestibilities. This was popped up also, but not as high as the circle with the 5.

Click for a closer look.

     What would I do differently? I thought about putting a gold ribbon around the neck of the unicorn. I looked up photos and none of the unicorns had anything around their necks, except some had flowers. I guess you can't rope a unicorn ;- ) While doing this, (and I had suspected and was checking this also, but had already done the hooves) I noticed that none of the unicorns had black hooves (ok 1 or 2 may had), but white or pink ones. At this point, my son said to me, "Mom, unicorns aren't real. You can make them look any way you want!" These are the type of perfectionist details I'm suppose to be recovering from ;-) 
Later, when I was done I thought a dusting of Perfect Pearls over the body might have been a nice touch too. So these are some ideas for another time. I do think she will really like her card.

     Thanks for stopping by. Hope some of you are getting some cooler weather. We finally are. Who would have thought mid-80's would have been cooler ;- ) The front going through took my migraines with it, so good riddance. Please leave a comment. It just takes a moment and I really appreciate knowing you are out there. Have a wonder-filled weekend.