Showing posts with label Expression. Show all posts

Monday, March 12, 2012

Cocoa cards on their way to college ;- )

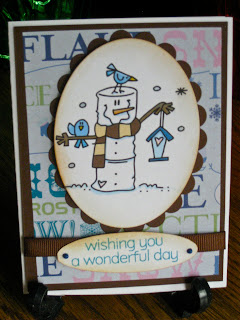
     Well, the cards have been on their way for a few days now, but my husband believes in sharing and shared his nasty cold virus with me (which may have some home from college in the first place with our son, but he doesn't usually get very sick.) There are 14 cards in total, but only 10 were still here for there photo shoot ;- ) The cards for the guys all use the same pattern paper, while I use a few different pattern papers on the ones for the gals.

     The image is from Bugaboo Digi Stamp and I won it during a blog hop from Cely (Creating in Carolina) back during Christmas in July. I colored it digitally, which sure makes making multiples easy ;- ) and cut them out with the large oval nestability. The pattern papers are all from DCWV Holiday Collection Christmas Stack. The mats are a Bazzil paper from Archiver. The ribbon was scavenged from boxes of Godiva Chocolates over many years ;- ) (Yea! Hubby) I used Viva Decor Pearl Pens, to add the pearl dots, on the sentiment, which is from Hero Arts Big Hugs (stamped with Tumbled Glass Distress Ink and clear embossed) and also Sickles on the hearts for the gal cards, but only Stardust pens by Sakura to the hearts on the guy cards. Oh, and of course there is inking! The oval for the sentiment was cut on the Cricut using the Gypsy and Accent Essentials, after making sure the keep proportions was unchecked. A friend came over the first day and helped me cut our all of the images, mats, paper and card bases, so a special shout-out to Diana for her help!!!! Her daughter will get her card this week ;- )



     On the first cards, which went out before I took photos, I used pattern paper on the inside, but realized that the sentiment inside covered so much, that it was a waste, so I then just used more of the Bazzil card stock to mat the sentiment. The fonts in the sentiment are LD Penelope (from Lettering Delights) and Kingthings Christmas (the snowy font, available as a freebie Here or at dafont, but dafont was down for maintenance when I went to link to them.) I had added a post-it to the cocoa, because it required the addition of milk instead of water and I wanted to be sure they noticed that. I embossed a stamp from Inkadinkadoo's Warm Holiday Wishes with silver glitter finish.


     Sorry, about the photo, but the sun came out from behind the clouds and I usually photo after the sun is well past this window, but they needed to get into their envelopes. I created eveloboxes with The Ultimate Crafter's Companion for each of these cards (sorry, I didn't photo them), so there was enough room for them to fit. My son said his college treated his card like a package and sent him an e-mail when it arrived and he had to pick it up from the package person.

     Hope your week is full of inspiration and warm weather. We are expecting great weather here ;- ) Thanks for stopping by and I'd appreciating hearing from you! Your comments mean so much to me. Feel free to ask me any questions too!

Tuesday, March 6, 2012

Mickey Birthday wish.

     Still haven't finished all of those college cards, but I'm getting closer, ha ha (another one has gone out the door - see I'm getting there.) However, I do have a card for today and a finishing touch on another. I thought it might help for some inspiration on finishing the inside of cards, which can be a stumper at times ;- )

     First up is everyones favorite Mickey Mouse. This card is for my neighbor's grandson, who is turning 3. I used the Mickey image from the Mickey and Friends cartridge (the fourth key) and all it's layers at 3.5 inches. I set it all up on my Gypsy so I could position my pieces precisely, because my mat is currently only sticky in some spots >.< I need to clean and re-stick a few of them, since I do have more than 1 not-very-sticky mat. The Gypsy however lets me decide where I want each piece to cut and place a few of them in those exact spots. Very helpful. I also used the Gypsy to weld the letters for the sentiment from the Plantin Schoolbook cartridge which does have a shadow font for it's main font (nice touch!) The blue card stock was embossed with Sizzix's Texture Plates #2 Square Dancers.


     On the inside I used Lettering Delight's font LD Walt. Using Print Shop, I set up the sentiment first in red and  then in black and laid one over the other to give it a shadow. The signature is in Helvetica, which I thought I'd changed to something else, but evidently not, ha ha on me.  You can find a link to Lettering Delight on my sidebar. I cut out the number 3 from Plantin Schoolbook with the basic font and the shadow at 2 inches and popped it up.

     Over the weekend, it was Parker's grandfather's birthday (he has his pilot's license.) Now I'd made his card back in Nov. for Crafter's Digital Art Center's Challenge at the time, but hadn't totally finished the inside. It is an easel card and here is the card and how it appeared then (this part still looks like this ;- ) You can find the details on this card here.


     Inside, I used LD Chaplin, LD Lively (for Good Times) and LD Wedding (for the signature) from Lettering Delights for the fonts. The plane graphic comes from the Print Shop software. The details for the rest is at the same link as the front, since that was all done in November.


     As always, thanks for dropping by. I love hearing from you so much, so please leave a comment before you go ;- ) have a wonderful week!

Friday, February 10, 2012

Valentine for a Techie

     Well, I surface again <.< Today's card is a valentine for my son. The sentiment was cut from Cricut's Martha Stewart Seasonal Cake Art Cartridge. I learned it's best to size for your width with this cart, because otherwise it goes very wide thinking you're making a cake (I was using the Gypsy, so I could see the size ahead of time), but when you select the size to cut the shadow, be sure to select relative, but use the height number of your cut to get the shadow to match your tip cut. The software is use to expecting things sized to height, so that's the way it computes the relative size. The pattern paper is Paper Studio. I actually made a mistake her and the sentiment and it's shadow are suppose to be reversed. They are suppose to mimic the colors and style of my son's computer as you will see on the inside.


     The SVG on the inside is cut using Sure Cuts A Lot a a file from Designs On Cloud 9 called Tech Toys. The set also includes game controllers and an iPod. You can find the file here and check out some of there other cute files. They also have a free file each week!!! The papers are Bazzill from Archiver's. The sentiment on the computer screen is also welded and cut using Sure Cuts A Lot2 and the font  is Orbitron. If you'd like the cut file,  just let me know. The pattern paper is from Generation Tech by DCWV.


The matted sentiment on the bottom is printed digitally using the same font. I used stickles to re-create the look of his speakers and a white gel pen to  mark the keys on the keyboard that spell, Valentine. We'll see if he gets that code ;- )


     I also added a tab similar to a pop-up card, so that it allows the card to open and close properly and so that my son could set it on his desk in the open position and admire his computer look-alike, without the bottom of the computer flopping loose.


     Well, I also forgot to distress the white a bit, in my rush to get his package of goodies off to him at college. I think he'll like it though ;- ) Thanks for stopping by and giving me some of your precious time. Please, leave a comment before you go, I can use a boost. have a spectacular weekend!

Friday, November 11, 2011

Birthday Wish for a Guy

     This is one of those cards, that looked better in my head, then it did when I was done >.< Probably, because in my head, I haven't chosen the papers, just the idea. Both the card base and the sentiment were cut from Cricut's Birthday Bash cartridge.  I embossed the background with Cuttlebug's Christmas Stars and used My Mind's Eye twine. I popped up the DP, which is from Paper Studio and popped up the sentiment on it. The DP is edged with a gold paint pen. This card is for my son's best friend in middle school, who is at a different college than my son. He has a great (though sometimes quirky) sense of humor and wouldn't be demanding of the looks of the card, fortunately ;- )


     No time for second guessing the front, so moving on.  The font in the multiple choice section and the Happy Birthday is Bevan (all can be found on the internet, try a google search), the one in the parenthesis is Beetle and the one in the salutation is Black Jack. The boxes and the check mark were made in Print Shop. Matt will enjoy the humor.


     I didn't get much done on the next card. First I found out I couldn't get it into the mail tomorrow anyway, because of Veterans' Day (there is no mail.) Then I needed to shop for baking ingredients, because a friend and I are doing MAJOR cookie baking all day Saturday for my Christmas Party and just for the holidays for her. It took longer than I would have thought, as DH and I stopped to eat and I looked for some wire for the next card too. Some of these cookies will probably even find there way into a shipment to the college students. So, I'll need to really move it on that next card and make up some of the doughs that need to chill overnight.

     Thanks for shooting by. Please leave a comment, because they keep me motivated and mean so much to me ;- ) Have a blessed weekend!

Tuesday, July 5, 2011

Male graduation card.

     Today's card is another graduation card, only this one is for a male. We have a graduation party to attend this weekend. One of the cards in the earlier posts is for his sister and the party this weekend is for both of them. She is graduating High School and he is graduating 8th grade. To see her card (if you missed it and are interested), click here. I know in some areas, 8th grade graduations aren't celebrated. Here, depending on where you go to school, you child may attend the same school from Kindergarten (or pre-school) right through 8th grade, with the same kids, making it a bigger event, then if they changed schools at the middle (or junior high school level).

     The papers are from Paper Studio's Graduation Paper Pack and the stickers are from Stampendous Class a'peal. I cut the name with Cricut's Plantin Schoolbook cart in the standard setting 2 times and popped it up. I embossed the sentiment with silver glitter embossing powder.


     On the inside, I just matted the sentiment, I wrote digitally with Print Shop using the LD Dabble font from Lettering Delights and I stamped the stars (Northwoods) and embossed them using silver glitter embossing powder.


     I think it turned out nice, though the star on the right should be over to the right a bit more, but I have a tendency to just eyeball things.

I still have a wedding card to do and a few birthdays coming up. I can't believe the CHA Supershow is the week after next, though it's not the same this year. I was looking forward to taking a few workshops, but there aren't any. I guess it will just be make-and-takes and shopping. What I've really wanted to see were the booths in the real  CHA. Maybe some day.

Thanks for stopping by. Please leave a comment. I love to know what you think and that you stopped by. Hearing from you is a real pick me up ;- ) Have a joyous week!

Wednesday, June 15, 2011

Hats off to the graduates!

    Well despite the rain, I did get my last window box potted today and made 2 cards. The puppy and I decided to plant between the raindrops, but of course as soon as we got out, it started drizzling again. It was a good thing that I got that new window box, because as I was scooping the stones out of it, I suddenly saw the top of my table through what should have been the bottom of the old window box, Yikes!

 The first card is the same as the graduation card that I posted earlier. I did like how it turned out and I know the mother of the graduate I was making the 2nd one for liked it too, so I made the same one for her daughter.


     For the directions for this easel card, click here. The second card is for another girl from the same school, so I've used the same school colors. The pennants were made with the Martha Stewart Seasonal Cake Art cart. I used a lime green Sharpie marker to draw the green line down the center of the yellow middles of the banner to add more interest and the green backgrounds were embossed with Swiss Dots. The 2011 was done on the Gypsy with Plantin Schoolbook. The brads are Painted Brads from Recollections and the ribbon is Class Act (2010) from TPC Studio (I believe the have the same style this year too). The grad cap is an embellishment from Jolee. The background paper is from Paper Studio's Graduation Paper Pack (the same as I used for the other cards).


     I haven't done the inside of this card as I usually do, because I haven't decided how I'm going to finish it yet, so I wasn't sure which paper to use on the inside.

     I think the rose card is still my fav, though this is a nice change of pace. I tried a number of different things on the yellow part of the banners, but didn't have stamps small enough to fit on them. Looking at it now, I'm thinking that cap might need some perfect pearls on the edges to give it some bling and more dimension (though it is 3d in person ;- ). 

     Thanks for stopping by. Please leave a comment so that I know you were here. Your 2 cents means very much to me. Have a great and blessed rest of the week.

Saturday, May 7, 2011

Anniversary or Valentine ;- )


     Today's card is an anniversary card for a dear friend's oldest daughter. I used the same love bird stamp that I used on the wedding card I showed on the last post (by Inkadinkado), but I wanted this one to have a different look. I decided to use the heart from the Martha Stewart Seasonal Cake Cart. The pink cardstock in the back is Core'dinations Glitter cardstock. So, once I started in this direction, I found myself using pinks and reds. When the front was done, it looked like it could be a Valentine, but I basically decided that both celebrate the same thing... Love. So it's appropriate. The roses were ones I made with the Quilled Creations Quilled Roses quilling set, that I showed in this post here. I found this kit at Hobby Lobby. I frosted them with Martha Stewart fine glitter. The ribbon was on clearance at Michaels. I actually even remembered to round the corners this time. Woo Hoo!


     The inside was done digitally in Photoshop Elements. The font is LDWedding, for most of the writing,  LDJ Jilligraphy for the word "wonderful" and LDJ Revelry for the word "Romantic". All these fonts are from Lettering Delights. The heart flourish is from the brush set, Valentine-clip-art-3 from photoshopfreebrushes.com. The 3 red roses are from the brush set, inobscuro_roses. You can find it here. It says it works with Photoshop 7, but I use it with Elements 3, so if you like it try it. I used glitter pen around the hearts and on the rose details, but you can't tell in the photo.


     What would I do differently? I like how it turned out, maybe use purple to stamp the birds and in the ribbon, so it doesn't look so much like a Valentine, unless I was making a Valentine.

     Thanks for stopping by. Please leave a comment, I really appreciate hearing from you and knowing you were here. Have a Happy Mother's Day! Enjoy your families. 

Saturday, April 23, 2011

Guy cards can by fun.

     Today's card is for a guy who is 24 and we've known him since he was born.  He is someone who has kept that kid sense of fun. He loves working with kids at his Church. When we use to hike together, he use to always point out all the different types of mushrooms. His mom always said, that would be all the wildlife we would see, hiking with her 3 rambunctious boys ;- ) Pretty much was, except the time we found a rattlesnake. So for his card, I used the mushroom from Smily Cards, that was offered free from Provo Craft to Gypsy owners, and turned it into a shaped card. This was only the second time I've made my own shaped card and the first time with the Gypsy. Despite a few problems, figuring out what is what, with the layering, since Smily Cards doesn't have a handbook, I muddled through. So here it is.


     Pretty cute mushroom. On the inside, I used Print Shop to do the sentiment digitally and it's ability to shape the font block, first in a half circle and then in a square. I designed a smaller mushroom, on the Gypsy, figured out for sure where it would cut and put my printed paper there on the mat. The fonts I used were LD Jumpy from Lettering Delights (you can click on the link on the right bar of my blog, last week for their sale) and Casque Open Face Wacky (which is a free font available at a number of places, I don't remember where I got it though, just google font + it's name).


     I'm not usually it to puns, but it seemed to fit. What would I do differently. Well, some things were stretching for me, some were fixing mistakes. Not going to tell you which ;- ) For a guy, I think it works. How about you? Thanks for stopping by. Have a Blessed and relaxing Easter. Hope you are spending with your family. Please, leave me a comment. they are very much appreciated and I love hearing from you. Hugs, Debbie!

Saturday, April 2, 2011

21st birthday for a guy.

     I know it's been guy, guy, guy. Doesn't it seem to go in streaks like that!? Well as you can see from the title, this one is a special birthday, a 21st! I used SCAL for this one. Unfortunately I had had the drive on that computer die not long ago and I hadn't reloaded my fonts. Well, I didn't feel like it yesterday, so I just made due with a font that comes standard on an IBM. This is radical for me, because I love fonts and IBM really doesn't have many (I'm a MAC person.) I used Trebuchet MS in bold, italic as the font to cut out the 21. I also duplicated it and set the style to pointy shadow, a very handy feature of SCAL. The paper for the main image is AC metallic (love this card stock : multi-cut it though.) The embossing is Cuttlebug's Christmas Stars.


     The inside, as usual was done digitally, and here I got to use more interesting fonts. The font is LD Dabble, from Lettering Delight (remember Dollar Days ;- ) for the main font  and NewWGL4font, for the word birthday. Now that is what the font called itself, but when I went to look it up on the internet, I kept finding a totally different font, so beats me where it came from. I believe I got it from Urban fonts, which has many great free fonts, so if you're in a browsing mood you might check them out. The embellishments are JoAnne's brand.


     I tried to show the glitter on the background paper, the metal embellishments and the effect of the clear gel pen that I added to the confetti on the word birthday. I thought of coloring it, but decided I liked the monochrome look better.

     What would I do differently. I don't think I'd do anything differently. I really like this card. It's pretty easy peasy. I have made one similar to it before, but lost the file in the hard drive problem. I did use a different font for the 21 and I probably would change that, to a font that had a bit more tip or kerning to it, to give more movement to the front. The embossing is new and I like how that worked on this card. The inside fonts are also new and I'm liking them as well. What's your take on this card? Thanks for coming by and sharing some of your precious time here. Please leave a comment so that I know you stopped by, they keep me inspired! Have a blessed and inspirational day.