Showing posts with label Distress Ink. Show all posts

Tuesday, February 28, 2012

Easel card for a challenge.

     Hey, long time no see >.< Sorry about that. I have been working on a card for my college students and three have been mailed, but I forgot to take photos of them (hurrying to get those out the door, my son comes home on Friday, Yippeee!) Should have more of them done soon and then I'll post those (only 11 more to go, hee hee.) They are cocoa cards.

     Today's card is for the Progressive Challenge over at Crafter's Digital Art Center (here.) This is the last leg of this group of the Progressive, so you can get in the next round, if you would like to join. We get they greatest images to work with and the next group is free as long as you use one from the current group in a project within the challenge period (usually 2 weeks.) The first group is free and if you missed the first group you can join in for $1 and as I said we will be starting with a new first group on March 1st.

     From the title, you can tell todays' card is also an easel card ;- ) You are a quick group!  I used the image provided by A Day For Daises which is perfect for a card for my best friend from grammar school's daughter. I colored in in PhotoShop Elements. The only thing fancy was a multi-bristle brush you would find in the Assorted Brushes at the bottom left. It kind of looks like half a squiggly doodled spider, LOL. I used that with hair highlights and lowlights and dabbed or stippled with it on a base colored hair to make the hair look more realistic. I just kind of messed around with it until I got something I liked. You have to love that undo button. Only remember with doing this dabbing you can only undo so far (depending on how many levels of undo you have set) and you might dab a lot of times, if you use a small brush which will look better.

     The solid color papers are from Core'dinatiions and the pattern paper is from Paper Studio's Four Seasons paper pack, which is available at Hobby Lobby and has so many great patterns. I cut the scalloped circle with Quick Kutz Nesting Circle Dies, but I cut the circle with the Martha Stewart Circle Cutter, because I didn't want a circle as large as the one that came with the Quick Kutz set. For the oval sentiment I used Nestabilities Large Oval and Large Scalloped Oval. I inked the card edges and the image with Dusty Concord Distress Ink. The image also has some Tumbled Glass Distress Ink on it. I wanted to know back some of the starkness of the white. The sentiment is from Hero Arts Sweet Wonderful You and is stamped with Tumbled Glass Distress Ink. The ballet slippers with the bow is a free SVG from SVG Cuts, which I used Sure Cuts A Lot 2 and my Expression to cut. They have lots of free images and the ballet slippers are still available here.  You can check out SVG Cuts here. There is a link to the Sure Cuts A Lot software on my sidebar. I inked the edges of the ballet slippers and the bow with a Copic to give it more dimension and popped up the bow.


     Thanks for fluttering by today. I'm really glad that you were here. I do love reading your comments. Please leave one before you go ;- ) Have a wonderfully creative week!

Saturday, February 11, 2012

Heart Balloons at The Outlawz

     Today's card uses Sandi Huggert's image for The Outlaws Creative Freebie Challenge here. You can find Sandi's blog and images here. I decided to make this for a friend's daughter who didn't go away to college, so she doesn't usually get cards when I do my mailings to those away at college. I decided she could use a card too ;- ) My original vision was to paint the whole image with glitter and early on, I did some tests on that, but put it aside (which is never a good thing with me.) So here I am coloring in PhotoShop (which I would have done anyway so there would be color under the glitter ;- ) I tried to stay true to my vision/inspiration and went over the part I had planned to use silver glitter on with the Stardust glitter pen by Sakura. I did paint the red hearts with Martha Stewart glitter. I used black gel pen on the purple balloon. I added red Martha Stewart twine for the balloon strings. The circle and scalloped circle were cut with the Quick Kuts die set made to go with some of the Hero Arts stamps. The sentiment is from Hero Arts Sweet Wonderful You and was embossed with Red Dragon embossing powder from Stampendous. I inked it with Dusty Concord Distress ink. The rick rack was cut with a die from The Scrapping Cottage. Those of you with keen eyes will notice that I put the border on upside down >.< Just shows how things are going in my current state of craziness. I also should have rounded the corners.


     Thanks for stopping by two days in a row. I've have another progressive due on Mon. So I better get to work ;- ) Have a great rest of your weekend!

Sunday, January 29, 2012

Progressive Challenge for chocolate and book lovers.

     Today's post is another bookmark using a Bugaboo freebie image from Creative Digital Arts Center's (CDAC) Progressive Challenge. You can join this series for $1 here and as long as you participate, the next set of images are free. I colored the image in PhotoShop Elements and got the reflective effect on the glasses by using the plastic wrap effect that's available in the Filters in PhotoShop. The print fabric was made by using the Abstract Flower brush which comes in PhotoShop. The background paper is Jenni Bowlin's Brown and Cream Collection from Core Impressions. I sanded it to bring out the design. The sentiment was done digitally in PhotoShop as well using the font SNF Jester Curls. You can find Scrap N Fonts here. I inked both the image and the sentiment (the sentiment more heavily) to knock down the whiteness of the paper with Tea Dye Distress Ink. I think this will make a great gift for a friend, shhhh ;- )


     Thanks for dropping in and checking out my newest challenge entry. Hope you had a great day. Please leave a comment before you go. they really make my day ;- )

Friday, December 9, 2011

14 tags and the Cookies are on the Way for Finals! Also Freebie links!

     Well, you're probably wondering were I've been. the party's over and no word from me. I did also have a birthday this week and then I heard then some of my college students were on their way home this weekend!!! Yikes! The cookies haven't gone out, what is happening with this thing called time? Now I don't know what is happen to the college system, but it seems some of them just had to write mostly papers, instead of actually taking finals. What's with that. Don't they know it takes me time to make the 14 tags and mail the cookies? It takes days just to go over all of the possibilities of things that could be used on a tag!

     I finally narrowed it down to cutting the front of the tag with the Cricut's Christmas Cheer cartridge using the Joy tag. I used Design Studio to size it and lay it out with 3 tags on an 8 1/2 by 11 sheet of cardstock. Seemed like a good idea, until I went to cut the solid back and Design Studio can't hide the cuts (contours) of the word JOY to make a solid tag, so I had to do the backs with the Gypsy and due to the way the one program allows you to do the size verses the other, the backs are just a bit smaller. Should have used the Gypsy for both parts. The Baby Jesus in the manger is an SVG purchased from Svgcuts.com and is part of the set O Holy Night and cut it with Sure Cuts A Lot. You can find the link on my sidebar. The sentiment is a digital image from Meljen's Designs that I got as a freebie. You can find her images here. She usually has freebies on Mondays. The red paper is a digital paper freebie from Papercraft Inspirations Issue 94 (online). Go here and the click downloads to check out all of their goodies ;- ) Are you beginning to see a bit of a trend, ha ha. I love freebies! The green paper, between the front and back tag is from Sue at PSP Crafting Gallery. You can find her freebies and those of some others here.  The final freebie is the ticket, which is a Member freebie (membership is free), from Crafter's Companion on the UK site, here. It's part of the Nov. set.  The digital freebies include papers, digital ribbons, tags, buttons and other elements all designed to go together. There is a new set every month. Most of the tag was embossed with Sizzix's Snowflake folder from the Christmas set (thanks hubby for helping out!) Yes, my DH know how to run the Big Kick ;- ) Everything was inked with distress inks to make them pop a bit and there is glitter pen and white gel pen on the holly berries.


     On the back, the gold metallic embossed sentiment is from Hero Arts and the rest is inked with Fired Brick distress ink.  The ribbon is from Michaels.


And here they are with their cookies, waiting to get boxed up.

     Here are a couple of photos of the food from our party. We did it mostly potluck this year for the first time. Yummy!


And finally, this is what you might have taken home if you participated in our White Elephant ;- )

     Thanks for dropping by and making all the way through the post ;- ) Have a wonderful weekend and please leave a comment before you go. They really mean so much to  me!

Sunday, October 30, 2011

Sweet Birthday.

     This card is made for my Aunt. I used one of the images from the Crafter's Digital Art Center's (CDAC) Progressive Challenge. We're in the 5th round and this image is by SSBS Design.  This post is going to be short, because I have to be up at 4am to get my husband to the hospital for his surgery and I just got back from driving my sone back to college. I colored the image in PhotoShop using a few patterns on the basket, the gingerbread men and her dress and headband. You really can only see the one on her headband after the image was sized to fit my card, though the gingerbread men look a bit more cookie-like ;- ) I mixed and swirled colors to make her hair. There is Diamond Glaze on her shoe to make it look like patent leather and glitter gel pen on the gingerbread men. I used Broken China Distress Ink. The papers are DCWV Holiday Collection Christmas Stack from last year. The gems are from Hero Arts as is the sentiment and the flower from Archiver. If I had more time, I probably would have cut out more gingerbread men and popped them up (I may still her birthday is in December, but the challenge is due today ;- ) There is no inside sentiment yet, so when that is done, we'll probably review this card, LOL.
Maybe I'll remember it.


     Thanks for stopping by and please leave a comment. Thank-you so much to those of you who do. they really are much appreciated ;- )

Saturday, October 15, 2011

Anniversary Swirl

     Well, I'm still behind but I do have 1 card done ;- ) It's an anniversary card for a dear friend's (who I've known since 2nd grade and is my son's godmother) son and daughter-in-law.  I used the oval card in Cricut's Wild Card cart  (6 1/4 in. if you cut the envelope to fit a 12 in pice of paper) for this card and welded my own Happy Anniversary from the Plantin SchoolBook cart on the Gypsy using the Wisteria paper from Basic Grey adding a gem from Hero Arts for the dot in the  i and a flower from Creative Charms. In the nothing comes easy category of my life lately,  my Xyron was jammed, but fortunately the LetraTac came through for attaching the sentiment (see posts here, if you want to know more about LetraTac.)  To cover the window, I cut the blackout option and cut it in half, using only 1 oval here.


     On the inside, I made a digital sentiment using LDJ Jilligraphy font from Lettering Delights. You can find them at the affiliate link on my side bar. I also added a line element from Print Shop, which is what I laid it out in. I cut the sentiment with an oval nestibility and inked it with Distress Inks Peeled Paint and Concord Grape. The swirls are from the same Oval card in Wild Card, under the icon button and I used the Gypsy to reverse one of them. I added pearls to the ends.


     I made the matching envelope as well. I used the remaining oval, cut in half, in place of the envelope liner (I had a mail carrier to beat and waste not, want not ;- ) I might have blinged it up some if I wasn't in a hurry, but I do like the simplicity of the way it turned out, so maybe all in all it was a good thing. The green paper is Bazzil from Archivers.


     I will probably make, the now belated anniversary card that is left, the same, possibly in different colors. It will depend on what I find when I dig through the mess I made in my studio. I also will have to make a belated birthday card. She is such a good friend, she will understand and will probably get a call and maybe that will just be all she wants. She isn't a card sender, herself. Then I'm on to my next crazy bunch. I'm sure that I'm already running behind. >.< I know I need to make 2 groups to go out to the college students I send to.  I wanted to get them out before Halloween and I haven't updated my total to include the new freshman, so I don't even know how many I need to make. Though, I do know what I'm making. For the ones I sent to last year I have a design picked out and the new ones will get the same design I sent last year, ha ha!

  Thanks, as always, for stopping by. I'm glad you came.  Please feed my ego with a comment or ask any questions you might have ;- ) Have a blessed and creative day!
     

Thursday, October 13, 2011

Scaredy Cat plus some links to freebies.

     Today's card features an image from the 4th round of the Digi Freebie Progressive Challenge over at Crafter's Digital Art Center. The image is from Design2Delight Digital Stamp by Faith Skrdla. I colored it in PhotoShop. I decided it would be difficult to color the cat black (plus his features would disappear), so I got creative and checked out some free PhotoShop patterns and found some that simulated fur by Obsidian Dawn (find them here). I decided to use Cheetah ;- ) This card is for my husband's sister-in-law's birthday. She really loves halloween and her birthday is near it, so I usually do a halloween themed card. The font on the right is Firecat Medium by David Rakowski. You can get it here as well as a number of other places. The Snoopy is a free dingbat called Snoopy Ding by JBS you can find it here. The final font, at the bottom, is LD Penelope is from Lettering Delights. Just click the affiliate link on my sidebar.
     The sentiment on the right was inked with Black Soot Distress ink. I used a glitter pen on the eyes and mouth of the Snoopy pumpkin (sorry it didn't show up well in the photo >.<) and just had to color Snoopy's ear, eye and nose with a black gel pen. It just offended my Snoopy sensibility to see them orange, hee hee. The bottom sentiment was cut with the small scalloped nestibility. I also added a large black flower from Archiver with 2 buttons in the center tied with twine. Sorry, the photo quality isn't up to par, but my son has my camera. I miss it :-(

Click on photo to enlarge

     There's still time to join the next round of the Progressive Challenge for $1 to get the images. there will be 1 more round after that. Thanks for stopping by and taking a peek. Please leave a comment, because they mean a lot to me. Have a inspired day!

Friday, October 7, 2011

A Painted Garden Using Embossed Resist.

     Today's card is for my dear friend and neighbor.  I had purchased the stamp Flower Bird Garden by Hero Arts a number of months ago and hadn't even opened it yet. I thought it would be perfect for Linda, because she always has beautiful flowers around her house and I often visit while she gardens and I sometimes help pull weeds. We also water each others plants when the other travels ;- ) I was feeling a bit artistic, so I stamped it with Tumbled Glass Distress Ink and clear embossed it. Then I hand painted in the flowers and hummingbirds with Distress Inks. Yes, I did get out my Field Guide to do the painting on the hummingbirds ;- ) I colored in the light color washes first then added the darker details with a fine brush after it dried a bit. I created an embossed border with Cuttlebug's Frills Embossing Borders, then hand cut a pennant shape for the sentiment. The sentiment is from Clear Stamps (stamped with Marvey Brush markers)  and the shape was inked with Tumbled Glass.


     On the inside, I used a PhotoShop brush from Japanese Brush Pack 3 by darkgarden, to stamp the branch with the bird. You can find the brush set free here . The font for the text is LDJ Jilligraphy from Lettering Delights. You can find the link to Lettering Delights on my side bar.


     I zoomed to finish this up before her birthday because I've had a crazy week. I did get it delivered tonight though, phew!

Entered in the Sunday CAS Challenge at The Outlawz. Join us for the 1000 member Party going on this week!


     Many blogs are reminding you to schedule your mammogram, I'd like to remind you to have a colonoscopy, if you have a family history of colon cancer or are over 50. It's a screening test that can prevent cancer, though no one likes to think about the actual procedure >.< I finally had mine done and my husband goes next week, so if the shoe fits... so to speak ;- ) It can save your life or the life of someone you love <3 I have scheduled my mammogram too ;- ) 


Friday, September 23, 2011

Birthday Fun

     Well, I promised I'd post the card today and I will, but first let me explain, ha, got your attention now don't I. Before using this caption, I did get my husbands permission, since it's for a friend of ours, whom he works with. Also, I did not invent this caption, it's on the Sweet Treats cart from Provo craft, I just removed the candle, but it is valid for this image as well. Now you are really interested, if you haven't peeked already ;- ) (My son thought it was objectionable though, again Provo Craft made it up, not me.)

     The image, called favor is from the Sweet Treats cart also and I made it into a shaped card (actually the blackout of the image)  in Design Studio, changing both the length and width. It will fit in a business size envelope. I layered it with the main image and embossed the horn part with Swiss Dots. I used AC Metallic Cardstock and K andCompany Confetti Designer Mat Stack for the layers. I cut the sentiment from some scrap cardstock then I doodled on it with gel pens and a sharpie and inked it with Distress Inks. I attached it with pop dots.


     The inside sentiment was done digitally and the fonts are LDJ Birthday Bash from Lettering Delights (find them on my side bar - great fonts, dings, SVG's, graphics and cut-outs) and NewWGL4Font. Now there are a number of fonts with this name and I'm not sure where I got mine, but if you go to dingbats.font-cat.com here, you can find a number of them including this one and get them free. I had to fussy cut the papers and I added some metallic confetti that I had from Stampendous Class a Peel "Grad you Did It" graduation stickers.


     Actually, John is a very good friend and the card is fine. Thanks for stopping by. Please, leave a comment. they really do mean so much. Have a weekend full of inspirational activities ;- )

Friday, September 16, 2011

It's finally feeling like fall here, and Free PhotoShop Brush links

     It's finally feeling like fall and I can't wait for the next few days when it gets warmer again ;- ) It's suppose to return to the mid to upper 70's maybe even 80, so much nicer, then these lows in the 30's. The weather however, caused me to come up with today's card, which is a Thinking of You card. The papers are from Four Seasons Paper Value Pack by The Paper Studio. I came up with the idea for the card, while lying in bed early one morning. I didn't expect the image to be so big, but then I didn't have the stamps with me, ha ha. Since the image is so large, the card is 8 inches by 5 inches. I used a Hero Arts stamp for the tall pumpkin and a Stampabilities stamp for the rounder one. This is actually the first time that I masked while stamping and also the first time I colored an image by painting it with Distress Inks. The I went over some of the details with a colored pencil and some with a brown glitter gel pen from Sakura. I really liked how it turned out.  The sentiment is stamped with Clear Stamps Greetings and Mementos ink, adding a couple of Hero Arts gems. On the bottom panel, I added some popped up embellishments, that I had left over from when I use to do the Youth bulletin board and don't know whose they are.


     I've made this card for my aunt, whose eyesight has deteriorated due to diabetes, so the digital sentiment on the inside is quite large and I will include a personal letter as well. The font is Lobster Two Bold which was designed by Pablo Impallari and can be found at Font Squirrel for free here. The pumpkin graphic is actually a very cool PhotoShop brush called Fall Preview Sabordes. Which is a free preview that includes 5 brushes designed by Michael Murdock of Sabor Designs, that are actually sketches. You can find them at Brusheesy here. The full set (20 brushes) are available for $5. The leaves are also found at Brusheesy and include 50 brushes (leaves) from hawksmont and you can find them here (also free.) I had some other great finds, but didn't use them here ;- )


     So, it took a bit before I got this posted, because I was trying out some new things and checking out some videos. It's hard to balance actually creating with an end product in mind and creating with just experimenting and trying new techniques, but no actual output achieved, other than getting messy. Sometimes, I just like to get messy and learn something new, but it's not for show, oh, no! It's often for the circular file, ha ha, at least for now.
     Thanks for stopping by and checking out my newest card. Please leave a comment if you have time. Even if it's just to say Hi, I like to know you were here. It energizes me. Have a glorious weekend.

Sunday, September 11, 2011

The Big Three-0 and window box visitors.

     Well, as promised today's card is for my friend's son's thirtieth birthday, though I still don't see how that is possible, since we were babies 30 years ago. He must be adopted ;- ) Anyway, I embossed and sanded the Core'dinations cardstock using  the Cuttlebug embossing folder. I cut out the "30" from AC metallic cardstock, using the  Cricut Plantin Schoolbook Cart and the Gypsy, so that I could size the width and height separately and popped it up on the card. The sentiment is from Clear Stamps and is embossed with sterling silver embossing powder. I really got creative to make the label. I used the gypsy to resize what was suppose to be the mat from the "Families are Forever" card on the Cricut Just Because Cards cart. It would be button 34, the one with the tree swing in the handbook. I turned off the keep proportions lock and changed the proportions to .6 inches wide by 2.5 inches long. I added a brad and popped it up. The edges are inked with Ranger Distress Fired Brick.


     On the inside, the sentiment is done digitally in Print Shop. The fonts are LD Thankful and LD Dabble both from Lettering Delights. They have great fonts and dingbats, as well as SVG's and graphics. If you sign-up for their e-mails, you get 9 fonts free. You can check them out here, through my affiliate link or by clicking the link in my sidebar. I then added stickers from American Traditional Designs Party Icons, that I get at Hobby Lobby. The Happy Birthday pattern paper is also from Hobby Lobby.


     I think the inside looks kind of like a celebration ;- ) 

The other day I shared some roses, so today I thought I'd share some visitors to my flowers with you.


 Notice the center of it's back. How feathery it is. Click on photo to enlarge.


 Look at that face \. ./


     Thanks for stopping by. Please leave a comment, so that I know that you were here ;- ) Have a blessed day!

Friday, August 26, 2011

Quick note for a friend

     Well, my friends have been busy taking care of me. Two lunches out, in two days and a check up phone call from another. I almost didn't get this card done for one of them, who changed jobs, kind of, by switching as the librarian of an associated parochial school, since they closed her school this year (not the same one that I made the birthday card for). Now instead of a 5 min. commute, she has a 45 min. commute for the part-time job. So, this was a big decision and change for her (as well as the school being larger, so she has more classes). I wanted to send her a card of support. In between having lunch with her one day and lunch with a neighbor the next, I quickly put together, today's card.

I used my  Cricut Imagine and the Imagine More cart to print and cut all the images. The bird and it's wing are pop dotted. I used all of the layers on the front and added gel and glitter pens to the images to add some extra texture. I used my Fisker's cutter to trim the edge with the scallop decorative blade going back and forth to get a different edge. The sentiment is from Hero Arts and  is stamped in Chipped Sapphire by Ranger.


   The inside, is the first 2 layers from the same image as the front and I left it basically plain, to write my message. On the bottom, I stamped a bird from Hero Arts and a Bible verse from Clear Dollar Stamps, both in Chipped Sapphire.


     What could I have done differently? I should have made the notes on the front larger. I had meant to, but the first one started out small and tentative and then I was stuck >.< I wanted a bit more glitter and sparkle, but my gel pen colors matched better.  Maybe, some other glittery embellishment added on. On the inside, I thought about coloring the bird and I may still, when I write the note.

Thanks for stopping by and spending some time with me. Please, say hi, so that I know you were here. Exercise your creative muscle today!

Thursday, July 14, 2011

Summer wedding

     If the days are longer, how come there isn't enough time to do all of the summer things I like to do? What about lazy, summer days? They seem to be busy, busy, busy and there always seems to be more that I wanted to get done. Today's card fought with me on design and papers and elements, but finally... I won, ha! I used digital stamps on the front and inside. That was my starting point. I've had the files for awhile, unfortunately the only thing it said was PINweddingcouple. I couldn't find it with a search and I don't know where I got them so, I'm afraid I can't properly give credit for these lovely images. I cut the image with nesties, inked it with Concord Distress ink, added clear glitter gel pen (flower centers and the word LOVE) and matted it with pearlized black Bazzill card stock. All the pattern papers are Basic Grey Wisteria. I took light lavender card stock and stamped it with flower stamps using Perfect Medium and brushed it with pearl Perfect Pearls, to give it some interest (I also added so Perfect Pearls to the oval with the Bride and Groom and gave the plain card stock a slightly pearlized finish - it doesn't really show in the photo). I stamped ribbon from Michaels with Fresh Snow ink from Paper Trey, the sentiment is from Clear Stamps and added flower brads from Recollections topped with black pearls.

Click photo to enlarge

     On the inside, is the second image and more papers from the Wisteria collection. I used Photo Shop to edit both images using replace color to make the image more purple (it was originally greyish-brown). I added the text here as well. I used a new font, for me, called Black Rose. This is the script font that the names are in. It is a bit fancy for the more modern look of the card, but I liked it and wanted to use it anyway ;- ) It is a free font and you can find it by doing an internet search. The other font is Brush Script MT which is a standard font.

Click photo to enlarge

     What would I do differently? I'm probably too close to this one now to answer that >.<  I am going to enjoy the wedding though ;- )

     Thanks so much for stopping by, using up some of your precious summer time. Please leave a comment before you run on to picnicking,  swimming, sailing, smelling the flowers and just enjoying the day with you kids. Your comments do mean a lot to me.

Wednesday, February 23, 2011

The Guys Cocoa Packet Cards a Couple of Baptism Cards

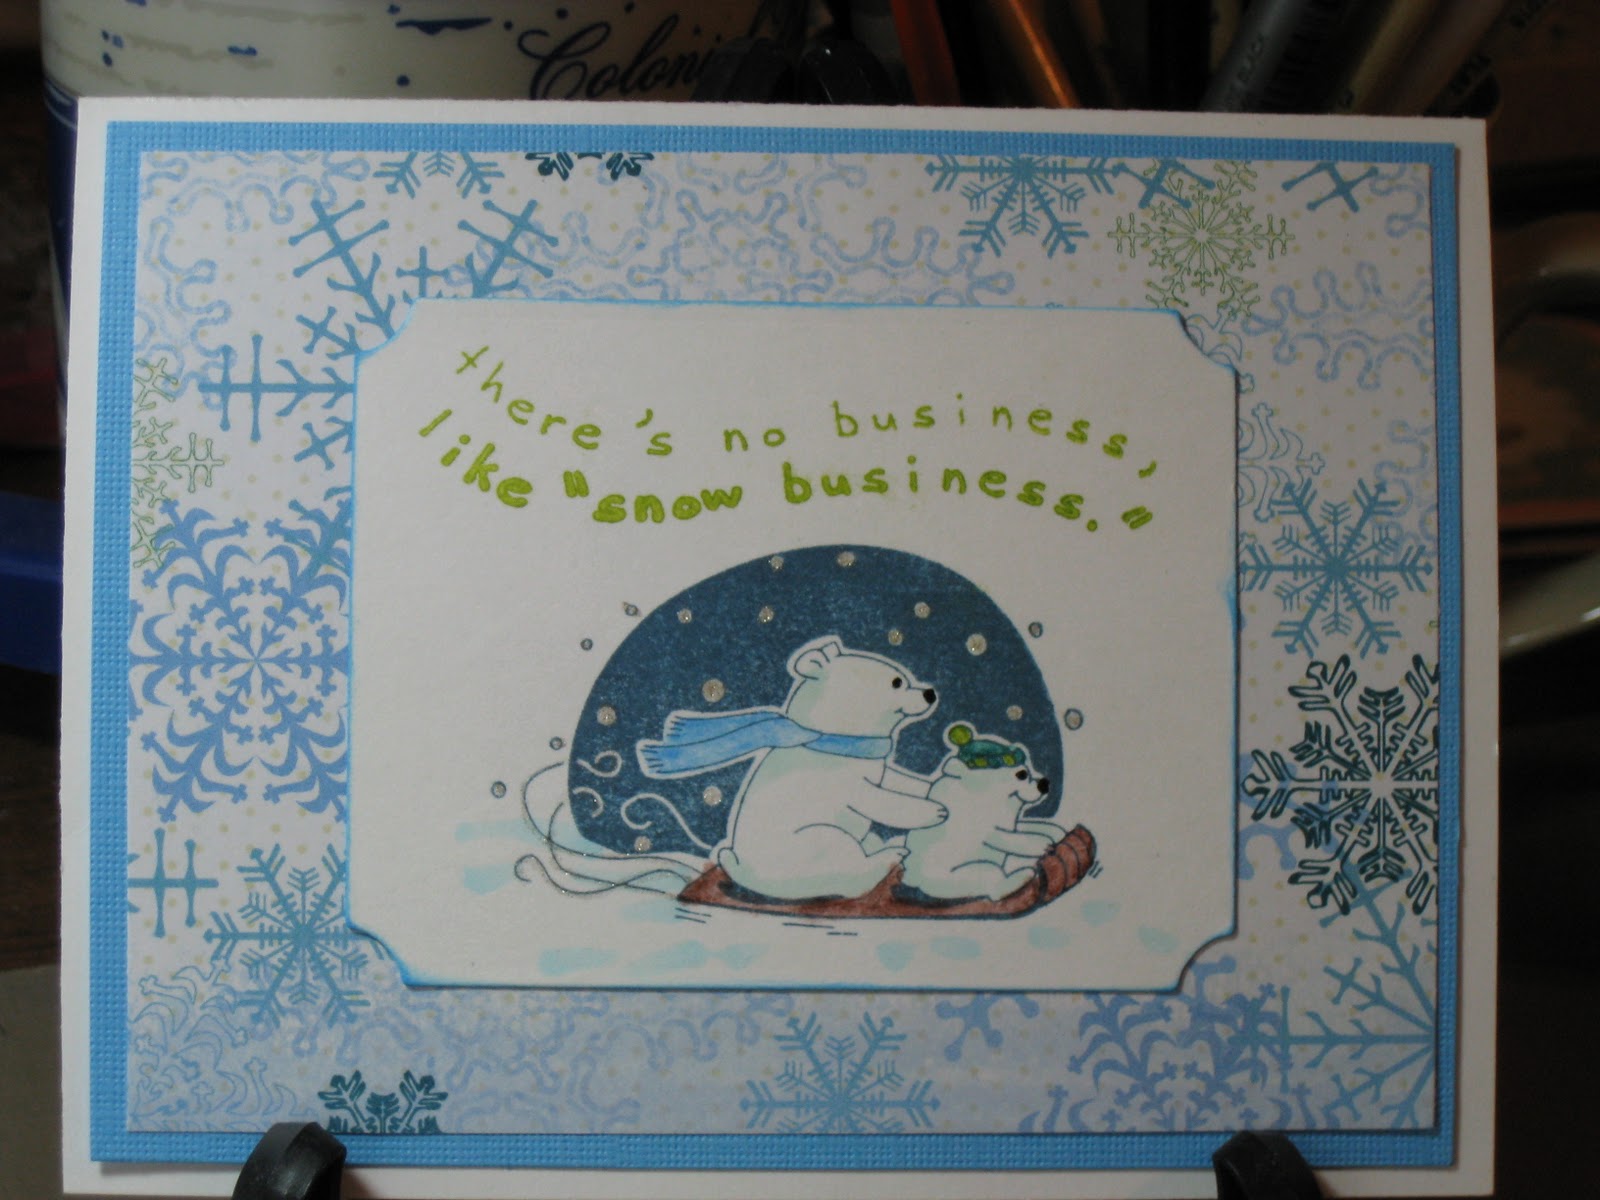
     Well, I had a productive day today. I went to lunch with a friend of mine to celebrate my birthday belatedly (my birthday is in December, but we had family medical things going on and it wasn't a good time). After she left, I started some laundry and headed up to the craft room. I worked on the male counter-part of the cocoa pocket card that a posted a few days ago. For this version I used a patterned paper from the DCWV Holiday Collection Christmas Stack. I used the same Inkadinkado Christmas Characters Stamp and colored it to match the paper, with Steadtler Watercolor pencils, Gelly Roll Clear Star for the snowflakes and trails behind the sled and a black glaze pen for the eyes and nose. I also used the same Copics BG10 on the bears and B00 to accent the snow and ground the image. The white rectangle was cut with a nestability. The sentiment was stamped with ink from Color Box's Petal Point Pinwheel collection. I also used the blue from the same collection to ink the sides of the white rectangle.


     Here are the two designs together.

If you'd like the directions for the cocoa pocket card, you can find it on the second post below this one.

     While ink was drying on this I worked on cards that I still needed to make for a gift for the Youth Director at my Church. If you've been following the saga since the beginning, I was making her some cards as a belated Christmas present (part of the December thing). The cards I've already given her are posted earlier on this blog. I asked her what else she could use, thinking I'd make her about 2 more cards and she said baptism, so today that's what I made. I think I might try to make her a couple of birthday cards, also, sometime soon. 
     The 2 cards I made are basically the same except for paper color and ribbon.  For the first one I choose green paper from Paper Studio's Pastel Cardstock Pack, cut a 5 1/4 x 4 inches and embossed it with Sizzix Divine Swirls. Next I added striped vellum cut at 4 3/4 x 3 /12 inches and added silver metallic dots to the corners. The green ribbon was some I picked up at Joanne's. I cut a scalloped oval with a nestie and stamped the wood mounted Stampabilities Ornate Cross on it with Big and Bossy, then embossed it with silver metallic embossing powder. I then added the oval popping it up. The oval was cut with a nestie also and stamped with Clear Stamps Wedding Congratulations in Dark Chocolate by PaperTrey Ink. It was double popped to go over the image. The inside is very basic for me. I just left if for her to write in. The butterflies were cut from some of the scraps with a Martha Stewart punch


     You see the yellow is basically the same, only embossed with Swiss dots and stamped with Summer Sunrise ink from PaperTrey. The ribbon is Best Occasions Self-adhesive Ribbon

     What would I have done different. The yellow one was actually done first and I realized that the vellum needed to be cut smaller, so I fixed that on the green one. On the green one, I had forgotten to add the ribbon and had to sneak it under after it was glued down, but it worked, phew!  I think the ribbon on the yellow is place to high. I like the placement on the green better. Well, we won't talk about how far the laundry got, but there is always tomorrow.
     Thanks for stopping by today and visiting with me. Leave me a note if you've got a moment more.  I may not be able to post on late Friday/Early Sat. because I will be picking my son up from college for his spring break. It doesn't seem like spring, but that's what the school calendar says. Maybe that's why so many of them go south, to find spring ;- ) Until next time then.

Saturday, February 19, 2011

Cocoa Pocket Card

     I have nine college students, who live away from home, that I try to send a little love. I planned for the next card to be a pocket card that would hold a packet of cocoa. (Who knew it would warm up in the midwest.) I looked around the internet, but most of  the ones I found were more box size, or just over size. I really wanted to stay with an A2 card, if I could, so I designed one my self. While choosing my papers, I realized I had 2 designs. One for the males and one for the females. Today, I show you the one I made for the females, since that's the only I've done ;- ) I have three to make for them.

     To start I  cut the paper 5 1/2 inches by 11 inches. Then I scored it at the 2 1/2 inch point and the 6 3/4 inch point. I then rounded the corners. The second photo shows how it will look when it is folded up.


     I then choose a pink paper from Paper Studios Pastel Cardstock Pack for the bottom mat and cut it to 5 1/4 x 4 inches. The next mat is a pattern cardstock with glitter and texture, that came from a JoAnn exclusive, they had the Christmas before last called Peppermint Forest. It was cut at 5 x 3 3/4 inches. I used my nestabilities to cut the large scalloped oval and stamped it, with the sledding polar bears from Inkadinkado's Clear Stamps Christmas Characters and also, the sentiment from the same set. The image was stamped with Papertrey's Enchanted Evening Ink and the sentiment with Colorbox's Enchantment Aqua Ink. I colored the snowflakes and the swirls in the image with Gelly Roll Clear Star. The clothing on the bears and sled were colored with Steadtler  Watercolor Pencils and also some highlights on the scarf with the Gelly Roll and the hat with a White Glaze Pen. The black on the bears (nose and eyes) is a Glaze Pen and a used Copic Markers BG10 to shade the bears and B00 to give some definition to the snow and add a base to the image. I also inked it with Broken China Distress Ink.


     On the in inside, I cut a different piece of glitter, embossed cardstock from Peppermint Forest for the front of the cocoa pocket. I planned the cuts to get the images from the paper. I cut a 1 x 2 1/2  inch rectangle of the pink paper, and rounded the corners. I then used my ATG gun to tape the sides of the pocket up. I used Versamark Dazzle and a small snowflake from the Inkadoo stamp set and randomly stamped the paper, then I stamped it with a sentiment from Hero Arts Big Hugs in Tsunkinako Black Ink. Each one of these cards is a bit different inside, due to the different characters on the paper. I didn't pop up the image on the front, due to the fact that the cocoa, already makes it tight in the envelope, however, on the inside I popped up the sentiment, since it's at the bottom and below the the bulge made from the cocoa. Unfortunately, I was out of 1/16 inch pop dots, but I'm thrifty, so I cut up the surrounding paper and used that. Shown below.


     The sentiment label was inked, except for one. That was the first one I put on when I was scrambling around to find my pop dots and so I forgot to ink that one. I get distracted by one thing and forget what I meant to do, hate that.  I decided I should make tags to go in the pockets with a personal note for each one. I stamped a tag with Big and Bossy using a grouping of snowflakes stamp and filling in with the small snowflake stamp and embossed it with White Embossing Powder. My plan was to spritz it using a mini-mister filled with Turquoise Perfect Pearls, water and Broken China Re-Inker. I found that one of my mini-misters is not a mister but a mini-jet sprayer! Well, that was interesting. I dealt with that and the first tag, which is too dark, but I'll live with it . I filled a new mister and did the other 2 tags and also added Worn Lipstick Distress Ink to the tags and wiped off the excess from the embossed areas.
I added Martha Stewart twine and will write a note on the back of this one and creatively on the front of the others.


     So, there you go, 3 card down and 6 more to go. They will probably be basically the same, but with different papers, but who knows. We will see where creativity leads that day. What would I do differently? Well, I am thinking of looking for snowflake buttons for the front yet or buttons in coordinating colors. With a total of 9 cards I didn't want to get too detailed or difficult.  I think I might have papered the inside of the pockets. I also might have embossed 1 or both of the sentiments, again trying to keep it fast. Thanks for coming back and looking. Drop me a word about how you see things.