Showing posts with label Stickles. Show all posts

Monday, March 12, 2012

Cocoa cards on their way to college ;- )

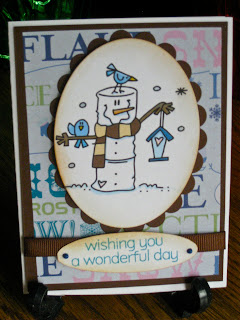
     Well, the cards have been on their way for a few days now, but my husband believes in sharing and shared his nasty cold virus with me (which may have some home from college in the first place with our son, but he doesn't usually get very sick.) There are 14 cards in total, but only 10 were still here for there photo shoot ;- ) The cards for the guys all use the same pattern paper, while I use a few different pattern papers on the ones for the gals.

     The image is from Bugaboo Digi Stamp and I won it during a blog hop from Cely (Creating in Carolina) back during Christmas in July. I colored it digitally, which sure makes making multiples easy ;- ) and cut them out with the large oval nestability. The pattern papers are all from DCWV Holiday Collection Christmas Stack. The mats are a Bazzil paper from Archiver. The ribbon was scavenged from boxes of Godiva Chocolates over many years ;- ) (Yea! Hubby) I used Viva Decor Pearl Pens, to add the pearl dots, on the sentiment, which is from Hero Arts Big Hugs (stamped with Tumbled Glass Distress Ink and clear embossed) and also Sickles on the hearts for the gal cards, but only Stardust pens by Sakura to the hearts on the guy cards. Oh, and of course there is inking! The oval for the sentiment was cut on the Cricut using the Gypsy and Accent Essentials, after making sure the keep proportions was unchecked. A friend came over the first day and helped me cut our all of the images, mats, paper and card bases, so a special shout-out to Diana for her help!!!! Her daughter will get her card this week ;- )



     On the first cards, which went out before I took photos, I used pattern paper on the inside, but realized that the sentiment inside covered so much, that it was a waste, so I then just used more of the Bazzil card stock to mat the sentiment. The fonts in the sentiment are LD Penelope (from Lettering Delights) and Kingthings Christmas (the snowy font, available as a freebie Here or at dafont, but dafont was down for maintenance when I went to link to them.) I had added a post-it to the cocoa, because it required the addition of milk instead of water and I wanted to be sure they noticed that. I embossed a stamp from Inkadinkadoo's Warm Holiday Wishes with silver glitter finish.


     Sorry, about the photo, but the sun came out from behind the clouds and I usually photo after the sun is well past this window, but they needed to get into their envelopes. I created eveloboxes with The Ultimate Crafter's Companion for each of these cards (sorry, I didn't photo them), so there was enough room for them to fit. My son said his college treated his card like a package and sent him an e-mail when it arrived and he had to pick it up from the package person.

     Hope your week is full of inspiration and warm weather. We are expecting great weather here ;- ) Thanks for stopping by and I'd appreciating hearing from you! Your comments mean so much to me. Feel free to ask me any questions too!

Saturday, January 28, 2012

The Outlawz freebie challenge - a day early ;- 0

     Today's post is a bookmark using Anne's image from The Outlawz Freebie Challenge here. You can find Anne's blog here. I colored the image in PhotoShop Elements. I added appropriate romantic titles to the book spines (fonts are Love Store in Nickelodeon, Love Poems in SNF Infinity and Sonnets in SNF Sunday Alternate - Nickelodeon (a freebie) can be found here and Scrap n Fonts can be found here (about $5, but they go on sale))  and added artwork using PhotoShop brushes that I'd picked up as freebies. The one on the top book (which is hard to see and you might want to click the photo to make it bigger to see any of this ;- ) is from the Heart brush set by Pop the bubble wrap, the middle book (on the spine) Heart brushes by Cassie and the bottom one by Hero Arts at 2peas Background stone etchings. The best way to find them would be to google Photoshop brushes + hearts or do browse over at Brusheeezy or deviantART. I added Diamond Lace stickles to the heart. The square mat was sprayed with Crafters Companion Spray and Sparkle Iridescent Glitter Varnish. The pattern paper is from Paper Studio. I experimented at the bottom and used a scalloped circle die from Quick Kutz to cut the edge. I added some card stock to the area above where I didn't want it cut, in case I went to far when I put it throughout the Big Kicks. I had just wanted a softer end on the bookmark.

     The nice thing about doing the image digitally is that I can make multiples. I'm thinking of using this to make some note cards for my librarian friend, with maybe a change of titles. She works in a school library, so I'll change them to children's lit ;- ) This one is for me though.


     Thanks for stopping by and I hope you are having a relaxing and creative weekend. I will be back soon with the other image and another bookmark. please leave me a comment before you go.

Saturday, December 3, 2011

Tag, you're it ;- )

     Well, for the Creative Freebie Challenge at The Outlawz, I decided to due another tag, especially with the Christmas Party being tomorrow. It would have been done yesterday, except for needing to let the glitter glue dry. Then today, a piece went missing :- p Kind of figures, doesn't it ;- ) So after searching for way too long, I remembered that the DCWV Christmas Stack (which all of the papers are from) has another sheet with the element on it and just re-did it. The image is from Sandi Huggett and you can find Sandi's work at Sandi's Samples here. I used Diamond Stickles on the candy canes, Sparkly Fluff on the top, heel and toe of the stocking,  Perfect Pearls on the body of the stocking. I applied a line of Crayola Pip Squeak glitter on the line between the  papers and glitter gel pen to the gift box that was cut out from the DCWV paper. There is also white gel pen added to the NOEL. The stocking image was printed twice and popped up. I'm not sure whose the holographic snowflakes are, because the company name is cut off of the package > . >


     I was out decorating for the birds, ha ha ;- ) and ... 


     The sun is setting way, way to early and it's way to far south :- ( 


     Well, back to work for me. Thanks for dropping in. Drop in over at the Outlawz and join the next round of the Freebie Challenge. Check it out here. Please leave a comment before you go. It means so much to me to hear from you ;- ) Have a wonderful weekend!

Thursday, October 27, 2011

     Phew, all 14 cards for my college students are done ;- ) My sofa is covered in glitter and snippets of paper, ha ha, but 5 made the mail and the others are stamped (1 awaiting a mailbox number.) I believe last year when I originally CASEed the one from Creating in Carolina I did them one at a time on the Expression. This year, I decided to move her SVG file onto separate layers so I could cut multiple of each item at 1 time. Here is the link to Cely's original post with her file. I made the card an A2 which makes the mouthes kind of small, so I thought I'd gotten rid of them all, but it still did the cut outs on the pumpkin. (Last year the pumpkin face was drawn in, no time for correcting mistakes this year. I'm down to the wire!)  I used Diamond Lace sickles on the moon, gel pens on the eyes, Crayola Pip Squeak glitter for the pumpkin mouth and Divine Swirls to emboss the background.


     The poem (which I showed on an earlier post) was one I found and modified. These are mostly students (trying not to call them kids ;- ) from my Church, who also had attended our K-8 Lutheran School, so I took the witch out of the poem. Yes, I know there is a ghost on the card, but he isn't doing sacrifices in the local forest preserves! You have to draw a line somewhere. Fonts are Lucinda Blackletter and LD Typset (the latter from Lettering Delights.)


     The card for my group that got this one last year, is the one that I teased you with. It is from... the Wild Card cartridge. It is cut at 3.75 inches on the Expression. I used my Gypsy, because the way Cricut designed it, the orange layer is the same as the black layer and you cut the square off and just use the pumpkin part of the cut. Too wasteful for me, so I used the Gypsy to overlay the cut, putting the next pumpkin on top of where the square would cut, continually overlapping the cards until the mat was full. This way I didn't waste so much paper. What was I going to do with a bunch of 3 3/4 inch squares of black paper anyway? I used spray glue on the "Boo" elements and then sprinkled Martha Stewart glitter on them. I colored in the eyes and mouth with yellow glitter gel pen.


     On the inside, I wrote with white gel pen. Font, debbie scribble, hee hee.

    
     There was also and envelope available with a liner. At first, not knowing the mailing code I thought I could use it. I made my son's in black however, because it's Family Weekend and I thought I'd just sneak his onto his desk. Later realizing my error (somewhere along the way, when my better judgement kicked in about mail codes) I decided that I would put the cute, small, decorative envelope into a normal A2 size envelope for mailing everyone's cards. On the white ones, I just went over the pumpkin with Marmalade Distress Ink.


     Here is the whole bunch, done, just before I noticed I only had 6 A2 envelopes left in the house and still had to call and get updated addresses for the students from last year and addresses for some of them for this year :- 0

Should have set them up better, would have if there was TIME! ;- )

     Thanks for stopping by and listening to my tale of woe. Hope you have a great weekend. Still so much to do before my husband's surgery and he's out of commission for at least 4 weeks. Please leave a comment, because they mean so much to me. It will be a great weekend, because I'll be seeing my son!

Monday, August 15, 2011

A day at the beach!

     Today's card is for a friend's daughter, who went to school with my son from Kindergarten through 8th grade. She turned 19 on Friday and my son turned 20 on Saturday. Us moms have become great friends, we are very much alike, and they have also remained friends. I knew she had plans to go with friends to spend the weekend at the beach, so that was how I themed, my card. The weather forecast may have other plans however, so I began to hope my card wouldn't make her sad >.<

     I used Cricut's Life's a Beach cart and cut the card option for the lifeguard chair image.  Knowing I'd see, at least her parents for my son's birthday, I made a large card 7 x 11.75 (before folding). I then used the Gypsy to make a layer from the lifeguard chair image. The proportion weren't correct, so I used a separate layer and de-selected the keep proportions key. I then sized the height and width separately through trial and error until it matched up with the one from the card option (6.10 width and 6.5 height). I used Scattered Straw Distress Stickles to simulate sand and tried to make the lifeguard chair look a bit realistic, with some sand on it as well. I edged the brown part of the chair with copics.  I embossed the red layer of the umbrella with swiss dots and popped it up in the center, gluing down the sides and top edges. I added red and white twine from My Mind's Eye. The pattern background paper is Neptunes Wrath by Reminisce that I picked up at Archiver (it's 2-sided as you will see from the inside photo. ) The label was cut from Just Because Cards. It's the Shift key of the main key for the "Corny" card, believe it or not, but I liked the shape and thought it would make a good label. It's used as a vertical panel on the card, so I just turned it and cut it, at I believe, 2.5 inches. It's stamped with Clear Stamps in Mementos and I added two red brads.


     The sentiment on the inside was done digitally and the fonts are Beach and Handwriting- Dakota. I cut the beach ball and the sandals both from Life's a Beach. The red on the beach ball was embossed using Tim Holts's Fades Folder Regal Flourishes. The pattern paper was a scrap and I'm afraid I don't know what it is. I almost didn't have enough and was worried, because I loved it for the base of the sandals.


     I like how this card turned out. I'm not sure about the sand on the chair steps or not, but I didn't like the starkness of it either. I love the look of the pattern paper and the sandals. So, all in all I'm happy with it.

     I hope you got a chance to snap up some deals at Menards this weekend. I meant to post about them (with the rebate, which is a store credit, basically you could get Cricut mats and carts for under $5), but with my son's birthday, I'm sorry I just didn't get it posted ;- ( I did get 2 sets of mats and 3 carts though. I figured we would use the store checks to buy driveway and deck sealant. I thought the sale was only for 2 days, but the coupon says it was for a whole 3 days.

     Thanks for stopping by and I'll try to better better about posting info like the sale, when I know it. Please, leave a comment so that I know you stopped by. It really means a lot to know you were here. Have a creativity filled week.

Saturday, July 9, 2011

Ladybug, little girl card.

     Today's card is from Cricut's Birthday Bash cart. I made this card for the daughter of a friend and ex-colleague of my husband. I cut the ladybug, base and the number 5, (which comes from the next page of the handbook) on 3 1/4 inches. The pink and green cardstock is Bazzill and the pattern paper is Paper Studio from Hobby Lobby. The ladybug is embossed with swiss dots. I used frosted lace stickles on the black spots and diamond glaze on the antenna tips.


     For the inside, I used the sentiment from the same page as the ladybug. I doodled on it with a green glitter gel pen, to give it some interest and added a gem, from Hero Arts, to one of the i's.


     What would I do differently? I might have made the ladybug smaller. I thought about faux stitching the pink layer, but wasn't sure if I could do it neat enough. Should try that before I glue it down. Maybe texture emboss the inside pink layer, but I don't know.

     I don't know why I think I'm further along than I am after I pick the image I'm going to use and maybe the sentiment. Sometimes, I even have a basic layout in mind, but I seem to forget how long it takes to pick the papers for the pieces, if I'm cutting the image out, decide on embellishments, decide the total color scheme, choose how the sentiment will be displayed and all the other "little"decisions like that (embossing, pens, glitter, ribbon.........).  Fortunately, this card isn't needed until the end of the month, but I have others I put aside because I thought I knew what I was doing with this one, it would be quick, ha. It always takes longer than I thought. I need to hunt for supplies for 2 of the others, for the basic idea rattling around in my head, that will of course take 10X longer than I anticipate ;- )

     Thanks for checking out my card and my random thoughts. Please, leave me a comment if you've got a moment. I really appreciate them. Have a blessed day!

Wednesday, January 19, 2011

Birthday card for a Friend

     Today's card is a more typical card for me. It's for my friend Gywn. Typically when I make a card for a friend I try to tie it to that person. I don't make many general cards. In this case the image will be a penguin, because Gwyn has often considered that her symbol. She uses the word penguin to tell people how to pronounce her name, so that they don't mispronounce it Gwen. So it's convenient that she has a January birthday. Let me show you the card and then I'll tell you how I made it.


     I used the penguin from the Cricut Create A Critter cartridge. I cut the penguin with the layers at
2 1/4 inches on my Cricut Expression. I used the Gypsy to lay the whole card out first to make sure the words would fit in the space of an A2 card. After I had all of the penguin layers set out, I choose the phrase, "chillin'" from the same cartridge. I sized it at 2.5 inches wide and it was cut out of the DCWV Holiday Collection Christmas Stack. I realized it would be too similar to the background paper and since it was already the shadow cut, I made a second cut out of black and sized it 1.45 inches high. The original cut was 1.35 inches high, so I went up one tenth of an inch to make  the background cut. Due to the fact that the cuts are curved, it's not really a shadow, but I placed it so that it shadows as if the light were below it. I used the Cricut cart Lyrical Letters to type out "on your Birthday" at 1 inch high on the Gypsy and then welded the letters of each word except for the B. I tried the letters smaller, but the smaller letters didn't cut well, esp. welded. The orange cardstock is from Cord'inations. the rest was scraps, so I'm not sure. I used a pearl gem to dot the "i".  I used the Cuttlebug Divine Swirls folder to emboss the background layer with my Big Shot. I embellished the "chillin'" with Diamond Stickles, even adding icicles. here is a close-up.


     I had meant to try the icicles before the card was put together, in case they didn't work out, but as usual, I forgot my smart idea and had the whole thing put together first. Still, I tried my icicle idea and was happy with the way they turned out. On the inside, I matted 2 pieces of patterned paper from DCWV Holiday Collection Christmas Stack  (one at 5 1/4 x 4 and the other 5 X 3 3/4) and added the birthday wishes which I had done on my computer using Print Shop. The fonts I used were Snowcaps by Simply the Best Fonts and SNF Jester Play by ScrapNfonts. Snowcaps is a free font and SNF Jester Play is currently $5, but they often have sales and I think I got it for $1 or $2. I then added  a cute penguin dimensional sticker from Recollections and an epoxy bubble icon from Craft Essentials. What would I have done different? I had meant to tear some white paper to look like a snowy base for the penguin on the front to stand on to ground him, but forgot. I probably would have used Stickles on that as well. Otherwise, I'm pretty happy with the way this card turned out.
     I've been asked by a friend to do a card for a 100th birthday. Time to put my thinking cap on. If anyone has any ideas, please chime in. Thanks for looking in.