Showing posts with label Inkadinkado. Show all posts

Saturday, December 17, 2011

Elves have been sighted ;- )

     Elves have been getting busy. One is working on the tree and the college elf has been spraying glitter for the Christmas cards and has learned to use a corner rounder ;- ) Amazing growth, that college brings, ha ha. However, today's item, is still not our Christmas card. Instead, it is a square tag that I made using the image from the Freebie Challenge at The Outlaws due, surprise, today!

     The image is from Anne's Digital Design by Anne Fenton. You can find her blog here, where she often offers some great freebies. I colored it digitally in PhotoShop. The red cardstock is from Core'dinattions and the pattern paper is from DCWV Holiday Christmas Stack. I just happened to pick up the ribbon this week from Michael's this week, on sale. The sentiment is from Inkadinkado and I embossed it with Kaleidoscope embossing powder.  I went over the sign with a glitter gel pen and added Diamond Glaze to the berries (it appears it's not dry >.<) A nice, very simple tag, where you can put the To: and From: info on the back.


     I'd like to go back to cutting down our tree next year. Just shopping for it, as we have the past couple of years (partly due to the surgeries) causes us to go out for it later and the pickings are slimmer and I don't get to enjoy looking at it as much.  Hope your holiday preparations are coming along on schedule. Thanks for taking the time to stop by. Please leave a comment before you dash off. I really appreciate them. Have a holly, jolly weekend ;- )

Saturday, November 19, 2011

Creative Freebie Challenge at The Outlawz

     Well, here I am at another deadline, only this time I have no clue where the time went. I really love the images that we were given and I'm feeling bad that I just remembered today that it's the 19th, because I wanted to send more time with whichever image I chose. You know, do it's wonderfulness some justice.  I had planned on coloring it non-digitally, but with the short time, digital it is. I used a pattern on the top of the stocking to give it a more fuzzy feel. The wonderful image is by Sandi Huggett.  The papers are from K &Companies Peppermint Twist Specialty papers from last Christmas and some cream cardstock I had on hand which was embossed with snowflakes from the Sizzix Christmas folder set from last year.  The top of the stocking is stamped with a stamp by Inkadinkadoo from Christmas Wishes and embossed with Kaleidoscope powder. The inside of the card is unfinished, because I'm not sure who I'm going to send it to or if it will be a birthday card. I embellished the pink border snowflakes with Viva Decor Pearl pens. Sorry, for the poor quality on the photo, but I ran out of daylight :- (  You should come and join us at The Outlawz!


     I also went to Archiver on Fri, before going to get my son from college, and made their Make-N-Take.  I ended up rushing home, hoping that I wouldn't get all of the glitter all over the car >. > then the photo ornament might show my photo at my memorial service, if my hubby found red glitter glue all over the seats. Ha Ha! Here is a photo of the tag. Of course, every time I touched them, I had glitter glue on me!


    The photo ornament photo didn't turn out well, so I'll try to re-take it and post it another time (must have been all of the glitter.)  Thanks for stopping by and please, leave a comment before you move on. I really love to hear from you. Have a blessed Sunday!

Sunday, July 31, 2011

Two quick cards

     Well, I was down to the wire on two cards. It was a busy week and then I hadn't been feeling well, causing me not to get these two cards done earlier. So, here I was needing to get them done, before the mail carrier got here. Fortunately, I had a few tricks up my sleeve. I had picked up some note cards from Studio g in the Dollar Bin at Michaels', that had pre-cut windows. I'd also had on hand an assortment of embellishments that I've picked up over time, when there have been sales at Michaels' and JoAnn's. These are from JoAnn's Craft Essential 's line.  The front is embossed with Divine Swirls. The stamp, showing through the window of the anniversary card, is from Stampabilities. It was stamped with Big and Bossy and embossed with gold metallic embossing powder. Hint: Use a dryer sheet to wipe the area where you are going to emboss before you stamp to reduce the amount of powder that clings to unwanted areas. I wish I would remember this the ahead of time, every time ;- ) I colored it with both yellow gel and yellow glitter pens to make a champaign look and went over the glasses with Diamond Glaze.  Used my heat tool to speed drying.


     The inside sentiment is from Inkadinkadoo.


     The birthday card follows the same formula, only the stamps are from Hero Arts, made for Archiver. I embossed it with Swiss Dots.  Hint: I had to run it through twice and doing this would cause a section of the dots to de-boss, so I lined it up, to be the area where I would put my sentiment/embellishment. Always plan ahead - an interesting concept for me ;- ) OK, it was a happy accident the first time, but my pickiness, made me do this one a second time and I did it intentionally that time, so there!


It's really more red and maroon than pink.

     For quickie cards, I think they turned out pretty good. Kind of like the less expensive line of cards, but still with that homemade touch. We all have those times when we are out of time. The anniversary couple's daughter has a birthday this week and I need to make a unicorn card for her. So, they will get the full custom treatment then ;- ) As it turned out, it was good they were fast. I didn't just have to beat the mail carrier, but get to the post office before it closed, because I was out of stamps and traffic was horrendous because of a parade. Some days nothing is easy ;- )

     Thanks for stopping by, during your busy summer (if your north of the equator, like me.) Please leave a comment because the fuel me. Have a Blessed Sunday!

Saturday, July 9, 2011

Ladybug, little girl card.

     Today's card is from Cricut's Birthday Bash cart. I made this card for the daughter of a friend and ex-colleague of my husband. I cut the ladybug, base and the number 5, (which comes from the next page of the handbook) on 3 1/4 inches. The pink and green cardstock is Bazzill and the pattern paper is Paper Studio from Hobby Lobby. The ladybug is embossed with swiss dots. I used frosted lace stickles on the black spots and diamond glaze on the antenna tips.


     For the inside, I used the sentiment from the same page as the ladybug. I doodled on it with a green glitter gel pen, to give it some interest and added a gem, from Hero Arts, to one of the i's.


     What would I do differently? I might have made the ladybug smaller. I thought about faux stitching the pink layer, but wasn't sure if I could do it neat enough. Should try that before I glue it down. Maybe texture emboss the inside pink layer, but I don't know.

     I don't know why I think I'm further along than I am after I pick the image I'm going to use and maybe the sentiment. Sometimes, I even have a basic layout in mind, but I seem to forget how long it takes to pick the papers for the pieces, if I'm cutting the image out, decide on embellishments, decide the total color scheme, choose how the sentiment will be displayed and all the other "little"decisions like that (embossing, pens, glitter, ribbon.........).  Fortunately, this card isn't needed until the end of the month, but I have others I put aside because I thought I knew what I was doing with this one, it would be quick, ha. It always takes longer than I thought. I need to hunt for supplies for 2 of the others, for the basic idea rattling around in my head, that will of course take 10X longer than I anticipate ;- )

     Thanks for checking out my card and my random thoughts. Please, leave me a comment if you've got a moment. I really appreciate them. Have a blessed day!

Monday, June 27, 2011

I'm finally back!

     Well, after getting some party clean-up done I ... have created ... a ... card ... (and there is a sigh of relief).  Toady's card is an anniversary card for a woman who was my high school English teacher, way back in the day. So, I made a card with kind of a  retro 60's feel, to fit her day, not mine (well I was close) ;- ) I used Core'dinations Black Magic with a light pink core, but the pink is hard to see in the photo.  The embellishments are from me & my Big ideas, Ellen Krans edition of Soft Spoken. I used gel pen to color in the "O".

 
     The inside sentiment was done digitally, with Print Shop using Harrington font. I embossed a stamp from Inkadinadoo's spring mini assortment with clear embossing powder. The hearts and "Love Birds" are part of the same embellishments as on the front.


     What would I do differently? I would space the heart didn't have to go over my name ;- ) I might change up the inside embellishments to vary the card. On the front, I might raise the the whole line of embellishments and stamp a sentiment underneath. I also might use a darker red core of Black Magic.

     Our party went well and the weather was wonderful. Not too hot, a bit overcast (which is good, since we don't have much shade in our yard) and no rain. We had about 45 people or so. My DH forgot to snap any photos, probably too busy playing volleyball, esp. since my DS had been talking volleyball smack the day before and there were reputations on the line ;- ), so here are a couple of photos of the food from last year (basically the same, only the table clothes have been changed.


     Makes you hungry, doesn't it? You didn't even see the desserts. If your ever in the area at the end of June, you should stop by and join us. You'd be very welcome.

     Our new puppy did wonderfully, though he was exhausted before it was half over. He now has a name. It's Shadow. Though I still fell he needs a middle name and that one isn't clear yet. The other day, he was Shadow the Pirate because he he said "Arrrgggh" to me. So we made it, "Talk like a pirate day," here. Here is a recent picture of Shadow.


     He will get his first days of having a neighbor let him out, this week because, we have Vacation Bible School at our Church and that will put him in his crate for longer than 3 hours. It's good for him to get a trial at this, while he's little though.

Thanks for stopping by. Please leave a note if you have time. Your comments me a lot to me. Have a wonderful week!

Sunday, May 22, 2011

Quick thank-you card.

     I needed to make a quick thank-you card for a secretary at Church. I needed her to do something for me and waited until the last minute to ask >.< She was great, so I thought a thanks was in order. I was pressed for time and the stamping isn't great, though it's my 3rd or 4th try. Since it's late, I'm going with this one, knowing that she will be thrilled that someone said thank-you at all. So steal the idea if you like, just stamp neater ;- ) (Kind of embarrassed to post this actually.)  All the stamps are from Inkadinkado.


     I had better placement in other tries, but the Thank You stamp was on the block crooked or twisted in some way. Kind of weird. Sometimes getting a card to people is more important than, spending so much time on each card that you don't get some cards made at all. There are so many people that I would love to send thank-yous to or thinking about you, but I can barely keep up with birthdays and anniversaries. I've decided to try to make some quick and simple ones for these times and save the more labor intensive ones for the special occasions.

     I'm going to be out of town for awhile, so I won't have any posts until I get back. Then I'll have to kick things into gear, because I still have those graduations to do, plus June birthdays and such. Oh, yeah and a puppy to train soon after that ;- 0 Time marches on! Hope you are enjoying a wonderful weekend and have a beautiful week ahead. Hugs.... debbie

Saturday, May 7, 2011

Anniversary or Valentine ;- )


     Today's card is an anniversary card for a dear friend's oldest daughter. I used the same love bird stamp that I used on the wedding card I showed on the last post (by Inkadinkado), but I wanted this one to have a different look. I decided to use the heart from the Martha Stewart Seasonal Cake Cart. The pink cardstock in the back is Core'dinations Glitter cardstock. So, once I started in this direction, I found myself using pinks and reds. When the front was done, it looked like it could be a Valentine, but I basically decided that both celebrate the same thing... Love. So it's appropriate. The roses were ones I made with the Quilled Creations Quilled Roses quilling set, that I showed in this post here. I found this kit at Hobby Lobby. I frosted them with Martha Stewart fine glitter. The ribbon was on clearance at Michaels. I actually even remembered to round the corners this time. Woo Hoo!


     The inside was done digitally in Photoshop Elements. The font is LDWedding, for most of the writing,  LDJ Jilligraphy for the word "wonderful" and LDJ Revelry for the word "Romantic". All these fonts are from Lettering Delights. The heart flourish is from the brush set, Valentine-clip-art-3 from photoshopfreebrushes.com. The 3 red roses are from the brush set, inobscuro_roses. You can find it here. It says it works with Photoshop 7, but I use it with Elements 3, so if you like it try it. I used glitter pen around the hearts and on the rose details, but you can't tell in the photo.


     What would I do differently? I like how it turned out, maybe use purple to stamp the birds and in the ribbon, so it doesn't look so much like a Valentine, unless I was making a Valentine.

     Thanks for stopping by. Please leave a comment, I really appreciate hearing from you and knowing you were here. Have a Happy Mother's Day! Enjoy your families. 

Thursday, May 5, 2011

Wedding time of year.

     Today's card is a wedding card. Our friend's son is getting married. I used pattern paper that I had picked up at Hobby Lobby from Paper Studio. The stamps were Inkadinkado Spring mini assortment from JoAnn's (I think, either that or Michael's). The scalloped oval was made with nesties. I used a  Icy White Viva Decor Pearl Pen to make the embellishment from the birds to the heart.  I'm not sure why the embossing wasn't coming out very well. The embossing on the card, isn't the only ones I did. I made many attempts to get these. I re-package my embossing powder into different containers, so I'm not sure which gold metallic powder this is, because I couldn't locate the original container.


     On the inside, I used a stamp from Inkadinkado (Wedding/Anniversary set) and some stickers on my digital sentiment. The font is LDWedding from Lettering Delights.


     What would I do differently. Well, I meant to tip the sentiment on the front, but I should have tipped it more, because it just looks crooked. I wish the the embossing turned out better. What type of embossing powder do you like, for metallic embossing?

     While I was out in my yard today, I was greeted with this.


    Happy little volunteer flowers, peeking at me from near my patio. I only put potted flowers here, but some snuck out and have come up again ;- ) What a nice surprise!

     Oh, I want to add the Jacilyn Dashwood is having a  candy give-away on her blog. Click here to go there.

     Thanks for stopping by and looking at what I created today. Please leave me a comment and tell me what you think. It really means a lot to me, to know you were here. I hope your day will have a happy surprise in it as well. Have a great one!

Wednesday, March 9, 2011

Happy Anniversary!

     Sorry, I've been a bit awol, but I've been working on cheat sheets for my SVG files. That can be very time consuming. Today I did the updates to my Gypsy and my Imagine. I didn't have the problems some people reported, except the time I did the Imagine, it stayed on the "Restarting Imagine" screen forever without doing anything. For awhile, I even worked on the card for today with the Imagine and finally at one point, it told me it was done with the upgrade. Go figure.  The card today, I'm sure you guessed is an anniversary card. I used the Imagine cartridge, Better Together. I was inspired by a number of images and put them together for this card and came up with the inside sentiment. All cuts and paper are from the cart.


     The stamp on the front is from Inkadinkadoo and the sentiment inside was added digitally after printing the paper on the Imagine. This was a new accomplishment for me, since I only printed the pattern, the size I needed it. I got it placed right on the spot, the second try. Woo Hooo! There is glitter and gel pen on the front, but it didn't show up well, in the photos and I used layers and pop-dots.

     What would I do different? I think a frame, around the tan patterned mat, on the front would look nice. Maybe in a darker brown. I'd inked it with a light color, but maybe a darker color would look better. Otherwise, I'm pretty pleased with how this one turned out.

     I was able to purchase Cosmo Cricket Glubers at Archivers today, but haven't had time to play with them, as usual. Hopefully, soon. I want to try to make the daffodils, that Penny Duncan showed on her blog first. Click here to see her tutorial. They say spring, to me and I need spring!

     Thanks for stopping by today and sharing a few moments with me. I love to get your comments, and to know you were here. Have a wonder-filled day!

Wednesday, February 23, 2011

The Guys Cocoa Packet Cards a Couple of Baptism Cards

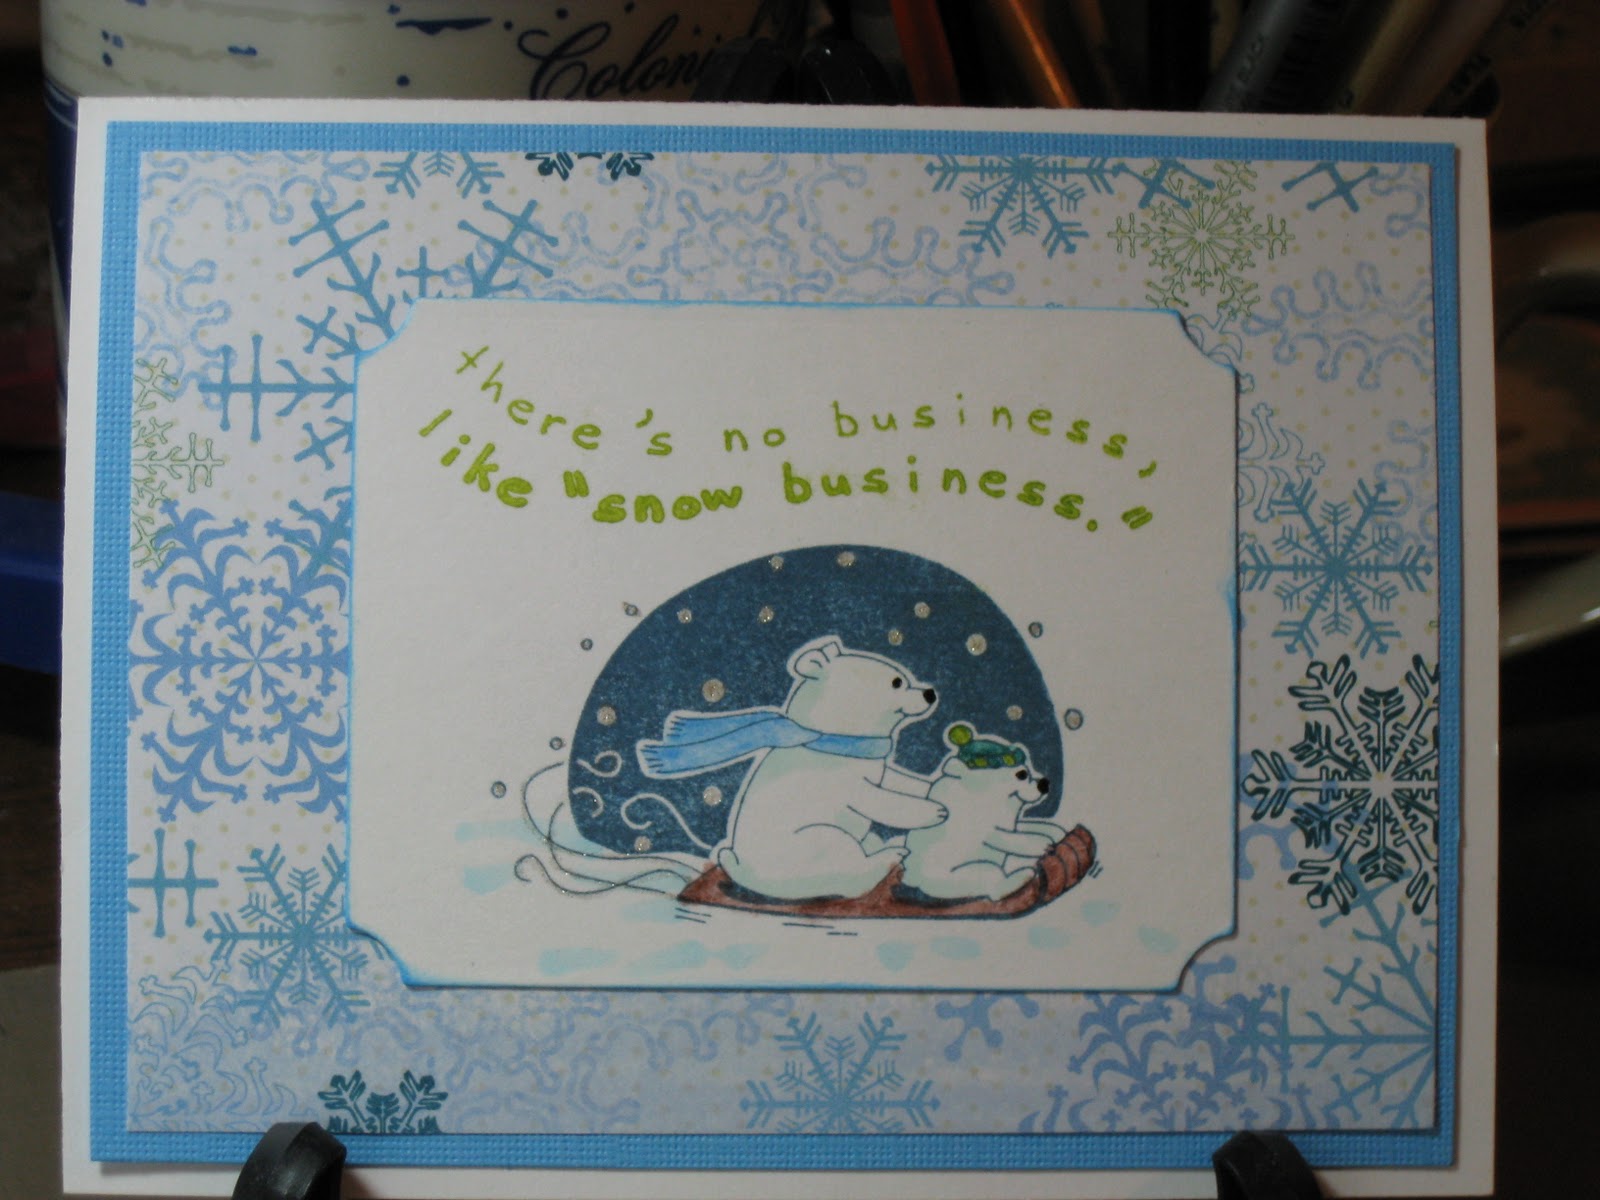
     Well, I had a productive day today. I went to lunch with a friend of mine to celebrate my birthday belatedly (my birthday is in December, but we had family medical things going on and it wasn't a good time). After she left, I started some laundry and headed up to the craft room. I worked on the male counter-part of the cocoa pocket card that a posted a few days ago. For this version I used a patterned paper from the DCWV Holiday Collection Christmas Stack. I used the same Inkadinkado Christmas Characters Stamp and colored it to match the paper, with Steadtler Watercolor pencils, Gelly Roll Clear Star for the snowflakes and trails behind the sled and a black glaze pen for the eyes and nose. I also used the same Copics BG10 on the bears and B00 to accent the snow and ground the image. The white rectangle was cut with a nestability. The sentiment was stamped with ink from Color Box's Petal Point Pinwheel collection. I also used the blue from the same collection to ink the sides of the white rectangle.


     Here are the two designs together.

If you'd like the directions for the cocoa pocket card, you can find it on the second post below this one.

     While ink was drying on this I worked on cards that I still needed to make for a gift for the Youth Director at my Church. If you've been following the saga since the beginning, I was making her some cards as a belated Christmas present (part of the December thing). The cards I've already given her are posted earlier on this blog. I asked her what else she could use, thinking I'd make her about 2 more cards and she said baptism, so today that's what I made. I think I might try to make her a couple of birthday cards, also, sometime soon. 
     The 2 cards I made are basically the same except for paper color and ribbon.  For the first one I choose green paper from Paper Studio's Pastel Cardstock Pack, cut a 5 1/4 x 4 inches and embossed it with Sizzix Divine Swirls. Next I added striped vellum cut at 4 3/4 x 3 /12 inches and added silver metallic dots to the corners. The green ribbon was some I picked up at Joanne's. I cut a scalloped oval with a nestie and stamped the wood mounted Stampabilities Ornate Cross on it with Big and Bossy, then embossed it with silver metallic embossing powder. I then added the oval popping it up. The oval was cut with a nestie also and stamped with Clear Stamps Wedding Congratulations in Dark Chocolate by PaperTrey Ink. It was double popped to go over the image. The inside is very basic for me. I just left if for her to write in. The butterflies were cut from some of the scraps with a Martha Stewart punch


     You see the yellow is basically the same, only embossed with Swiss dots and stamped with Summer Sunrise ink from PaperTrey. The ribbon is Best Occasions Self-adhesive Ribbon

     What would I have done different. The yellow one was actually done first and I realized that the vellum needed to be cut smaller, so I fixed that on the green one. On the green one, I had forgotten to add the ribbon and had to sneak it under after it was glued down, but it worked, phew!  I think the ribbon on the yellow is place to high. I like the placement on the green better. Well, we won't talk about how far the laundry got, but there is always tomorrow.
     Thanks for stopping by today and visiting with me. Leave me a note if you've got a moment more.  I may not be able to post on late Friday/Early Sat. because I will be picking my son up from college for his spring break. It doesn't seem like spring, but that's what the school calendar says. Maybe that's why so many of them go south, to find spring ;- ) Until next time then.

Saturday, February 19, 2011

Cocoa Pocket Card

     I have nine college students, who live away from home, that I try to send a little love. I planned for the next card to be a pocket card that would hold a packet of cocoa. (Who knew it would warm up in the midwest.) I looked around the internet, but most of  the ones I found were more box size, or just over size. I really wanted to stay with an A2 card, if I could, so I designed one my self. While choosing my papers, I realized I had 2 designs. One for the males and one for the females. Today, I show you the one I made for the females, since that's the only I've done ;- ) I have three to make for them.

     To start I  cut the paper 5 1/2 inches by 11 inches. Then I scored it at the 2 1/2 inch point and the 6 3/4 inch point. I then rounded the corners. The second photo shows how it will look when it is folded up.


     I then choose a pink paper from Paper Studios Pastel Cardstock Pack for the bottom mat and cut it to 5 1/4 x 4 inches. The next mat is a pattern cardstock with glitter and texture, that came from a JoAnn exclusive, they had the Christmas before last called Peppermint Forest. It was cut at 5 x 3 3/4 inches. I used my nestabilities to cut the large scalloped oval and stamped it, with the sledding polar bears from Inkadinkado's Clear Stamps Christmas Characters and also, the sentiment from the same set. The image was stamped with Papertrey's Enchanted Evening Ink and the sentiment with Colorbox's Enchantment Aqua Ink. I colored the snowflakes and the swirls in the image with Gelly Roll Clear Star. The clothing on the bears and sled were colored with Steadtler  Watercolor Pencils and also some highlights on the scarf with the Gelly Roll and the hat with a White Glaze Pen. The black on the bears (nose and eyes) is a Glaze Pen and a used Copic Markers BG10 to shade the bears and B00 to give some definition to the snow and add a base to the image. I also inked it with Broken China Distress Ink.


     On the in inside, I cut a different piece of glitter, embossed cardstock from Peppermint Forest for the front of the cocoa pocket. I planned the cuts to get the images from the paper. I cut a 1 x 2 1/2  inch rectangle of the pink paper, and rounded the corners. I then used my ATG gun to tape the sides of the pocket up. I used Versamark Dazzle and a small snowflake from the Inkadoo stamp set and randomly stamped the paper, then I stamped it with a sentiment from Hero Arts Big Hugs in Tsunkinako Black Ink. Each one of these cards is a bit different inside, due to the different characters on the paper. I didn't pop up the image on the front, due to the fact that the cocoa, already makes it tight in the envelope, however, on the inside I popped up the sentiment, since it's at the bottom and below the the bulge made from the cocoa. Unfortunately, I was out of 1/16 inch pop dots, but I'm thrifty, so I cut up the surrounding paper and used that. Shown below.


     The sentiment label was inked, except for one. That was the first one I put on when I was scrambling around to find my pop dots and so I forgot to ink that one. I get distracted by one thing and forget what I meant to do, hate that.  I decided I should make tags to go in the pockets with a personal note for each one. I stamped a tag with Big and Bossy using a grouping of snowflakes stamp and filling in with the small snowflake stamp and embossed it with White Embossing Powder. My plan was to spritz it using a mini-mister filled with Turquoise Perfect Pearls, water and Broken China Re-Inker. I found that one of my mini-misters is not a mister but a mini-jet sprayer! Well, that was interesting. I dealt with that and the first tag, which is too dark, but I'll live with it . I filled a new mister and did the other 2 tags and also added Worn Lipstick Distress Ink to the tags and wiped off the excess from the embossed areas.
I added Martha Stewart twine and will write a note on the back of this one and creatively on the front of the others.


     So, there you go, 3 card down and 6 more to go. They will probably be basically the same, but with different papers, but who knows. We will see where creativity leads that day. What would I do differently? Well, I am thinking of looking for snowflake buttons for the front yet or buttons in coordinating colors. With a total of 9 cards I didn't want to get too detailed or difficult.  I think I might have papered the inside of the pockets. I also might have embossed 1 or both of the sentiments, again trying to keep it fast. Thanks for coming back and looking. Drop me a word about how you see things.