Showing posts with label Gypsy. Show all posts

Monday, March 12, 2012

Cocoa cards on their way to college ;- )

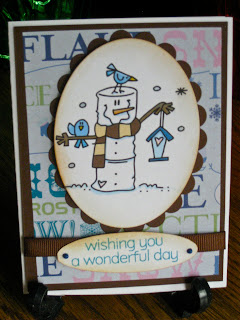
     Well, the cards have been on their way for a few days now, but my husband believes in sharing and shared his nasty cold virus with me (which may have some home from college in the first place with our son, but he doesn't usually get very sick.) There are 14 cards in total, but only 10 were still here for there photo shoot ;- ) The cards for the guys all use the same pattern paper, while I use a few different pattern papers on the ones for the gals.

     The image is from Bugaboo Digi Stamp and I won it during a blog hop from Cely (Creating in Carolina) back during Christmas in July. I colored it digitally, which sure makes making multiples easy ;- ) and cut them out with the large oval nestability. The pattern papers are all from DCWV Holiday Collection Christmas Stack. The mats are a Bazzil paper from Archiver. The ribbon was scavenged from boxes of Godiva Chocolates over many years ;- ) (Yea! Hubby) I used Viva Decor Pearl Pens, to add the pearl dots, on the sentiment, which is from Hero Arts Big Hugs (stamped with Tumbled Glass Distress Ink and clear embossed) and also Sickles on the hearts for the gal cards, but only Stardust pens by Sakura to the hearts on the guy cards. Oh, and of course there is inking! The oval for the sentiment was cut on the Cricut using the Gypsy and Accent Essentials, after making sure the keep proportions was unchecked. A friend came over the first day and helped me cut our all of the images, mats, paper and card bases, so a special shout-out to Diana for her help!!!! Her daughter will get her card this week ;- )



     On the first cards, which went out before I took photos, I used pattern paper on the inside, but realized that the sentiment inside covered so much, that it was a waste, so I then just used more of the Bazzil card stock to mat the sentiment. The fonts in the sentiment are LD Penelope (from Lettering Delights) and Kingthings Christmas (the snowy font, available as a freebie Here or at dafont, but dafont was down for maintenance when I went to link to them.) I had added a post-it to the cocoa, because it required the addition of milk instead of water and I wanted to be sure they noticed that. I embossed a stamp from Inkadinkadoo's Warm Holiday Wishes with silver glitter finish.


     Sorry, about the photo, but the sun came out from behind the clouds and I usually photo after the sun is well past this window, but they needed to get into their envelopes. I created eveloboxes with The Ultimate Crafter's Companion for each of these cards (sorry, I didn't photo them), so there was enough room for them to fit. My son said his college treated his card like a package and sent him an e-mail when it arrived and he had to pick it up from the package person.

     Hope your week is full of inspiration and warm weather. We are expecting great weather here ;- ) Thanks for stopping by and I'd appreciating hearing from you! Your comments mean so much to me. Feel free to ask me any questions too!

Tuesday, March 6, 2012

Mickey Birthday wish.

     Still haven't finished all of those college cards, but I'm getting closer, ha ha (another one has gone out the door - see I'm getting there.) However, I do have a card for today and a finishing touch on another. I thought it might help for some inspiration on finishing the inside of cards, which can be a stumper at times ;- )

     First up is everyones favorite Mickey Mouse. This card is for my neighbor's grandson, who is turning 3. I used the Mickey image from the Mickey and Friends cartridge (the fourth key) and all it's layers at 3.5 inches. I set it all up on my Gypsy so I could position my pieces precisely, because my mat is currently only sticky in some spots >.< I need to clean and re-stick a few of them, since I do have more than 1 not-very-sticky mat. The Gypsy however lets me decide where I want each piece to cut and place a few of them in those exact spots. Very helpful. I also used the Gypsy to weld the letters for the sentiment from the Plantin Schoolbook cartridge which does have a shadow font for it's main font (nice touch!) The blue card stock was embossed with Sizzix's Texture Plates #2 Square Dancers.


     On the inside I used Lettering Delight's font LD Walt. Using Print Shop, I set up the sentiment first in red and  then in black and laid one over the other to give it a shadow. The signature is in Helvetica, which I thought I'd changed to something else, but evidently not, ha ha on me.  You can find a link to Lettering Delight on my sidebar. I cut out the number 3 from Plantin Schoolbook with the basic font and the shadow at 2 inches and popped it up.

     Over the weekend, it was Parker's grandfather's birthday (he has his pilot's license.) Now I'd made his card back in Nov. for Crafter's Digital Art Center's Challenge at the time, but hadn't totally finished the inside. It is an easel card and here is the card and how it appeared then (this part still looks like this ;- ) You can find the details on this card here.


     Inside, I used LD Chaplin, LD Lively (for Good Times) and LD Wedding (for the signature) from Lettering Delights for the fonts. The plane graphic comes from the Print Shop software. The details for the rest is at the same link as the front, since that was all done in November.


     As always, thanks for dropping by. I love hearing from you so much, so please leave a comment before you go ;- ) have a wonderful week!

Friday, February 10, 2012

Valentine for a Techie

     Well, I surface again <.< Today's card is a valentine for my son. The sentiment was cut from Cricut's Martha Stewart Seasonal Cake Art Cartridge. I learned it's best to size for your width with this cart, because otherwise it goes very wide thinking you're making a cake (I was using the Gypsy, so I could see the size ahead of time), but when you select the size to cut the shadow, be sure to select relative, but use the height number of your cut to get the shadow to match your tip cut. The software is use to expecting things sized to height, so that's the way it computes the relative size. The pattern paper is Paper Studio. I actually made a mistake her and the sentiment and it's shadow are suppose to be reversed. They are suppose to mimic the colors and style of my son's computer as you will see on the inside.


     The SVG on the inside is cut using Sure Cuts A Lot a a file from Designs On Cloud 9 called Tech Toys. The set also includes game controllers and an iPod. You can find the file here and check out some of there other cute files. They also have a free file each week!!! The papers are Bazzill from Archiver's. The sentiment on the computer screen is also welded and cut using Sure Cuts A Lot2 and the font  is Orbitron. If you'd like the cut file,  just let me know. The pattern paper is from Generation Tech by DCWV.


The matted sentiment on the bottom is printed digitally using the same font. I used stickles to re-create the look of his speakers and a white gel pen to  mark the keys on the keyboard that spell, Valentine. We'll see if he gets that code ;- )


     I also added a tab similar to a pop-up card, so that it allows the card to open and close properly and so that my son could set it on his desk in the open position and admire his computer look-alike, without the bottom of the computer flopping loose.


     Well, I also forgot to distress the white a bit, in my rush to get his package of goodies off to him at college. I think he'll like it though ;- ) Thanks for stopping by and giving me some of your precious time. Please, leave a comment before you go, I can use a boost. have a spectacular weekend!

Thursday, January 26, 2012

A Second Penguin Waddles Out.

     A friend of mine came over t make a card for her niece's 2nd birthday and her niece likes penguins. I had already used the gypsy to make the file for a shaped card of a penguin using the Create a Critter cartridge. She said she thought the penguin would look cute with a hat, so we added a hat from the Everyday Paper Dolls cartridge. It is the headwear for the winter girl. We cut the hat twice in both pink and white and paper pieced it and added Martha Stewart glitter. My friend had brought the paper, so I'm not sure what we used. We added wiggle eyes to the face. We hid all contours on the cuts on the Gypsy.


     By the time we got to the inside, we were really pressed for time if we were going to go to lunch and she was going to make it to school on time to pick up her son (ok we were pressed for time throughout it all ;- ) We had some Church website things to work on before we were able to work on the card to begin with.   Sooo, we cut out the body again as a mat for the sentiment. We used Printshop to create a sentiment using  Calibri and NewWGL4 as the fonts. Then, I test cut another body piece in order to get the placement and lined up the piece with the sentiment on it and put it on the mat and by a wondrous act of God, my sentiment was cut in the cent of the body ;- ) We also cut a balloon from Create a Critter (it's the shift of the snake) and the number 2, because she's advanced and can recognize her numbers according to her dotting Auntie (from Birthday Bash.) 


     I thought of a few things I might change or enhance as we went, but we didn't have time, so I might have to CASE myself soon, ha ha. I think a know a young boy who likes penguins, at least he did last year. You may be seeing the updated version of this card in a month or so ;- ) If you'd like the Gypsy file for this, just let me know (with a way to get in touch with you) and I'd be happy to send it to you.


     Thanks for stopping by. Your comments mean so much to me, so if you have time, please leave me one. Have a great weekend!

Saturday, January 14, 2012

2nd Challenge in one day ;- )

     The freebie challenge is from The Outlawz and you can find us here. It looks like I goofed up though. I thought both challenges had given us extra time due to the holidays, but it appears the deadline was Jan. 1st for this image and I missed it. Oh well, here is my card anyway. I used one of the cupcake images that Anne Fenton created and colored it in Photoshop. I paired it with 2 patterned papers from Paper Studio and added ribbon from Michaels. I underlined the Happy Birthday on the one paper with a white gel pen and added an embellishment from Creative Charms (added - It's called Groovy Petals) that Diane from Capedia Designs sent to me. You can find a link to her wonderful blog here or on my side bar. I cut out Judy's name using my Gypsy and the Opposites Attract cartridge. Now, Judy does read my blog and I'm kind of bummed that she is going to see her card, so I'm not going to show the inside. We're not going to question whether or not the inside got finished in time. We are just not going to go there. Let's just say, her birthday is still a ways away and I don't want to spoil the surprise. 'nuf said OK!


     Thanks for dropping by and please leave me some feedback or a kind word ;- ) Have a wonderful weekend!

Two posts in one day ;- )

     Ha! bet you thought I wouldn't be back, well here I am and I will be posting twice because I have 2 challenge deadlines today (did I hear someone say, ahhh, that's why... hmmm.) Well, I've been busy playing scrabble and monopoly and going to the movies and just spending time with my family and friends, while my son was home. Then, there is always a let down after he returns to college. I'm suppose to use this blog and the card making to help me get past that, but I didn't fee like it, so there! I actually have been busy editing photos in Photoshop and I do have another card and a gift holder I made to show you, but I will keep those for maybe tomorrow. We don't want to overload you all in one day ;- )

     The first challenge is CDAC (Creative Digital Art Center). You'll find us here. I used the snow globe image from Crafty Ann's (only, wait, you can't see that yet.) They had provided a number of other nice images that you could pair with it, but since I have a friend whose birthday is coming up and she loves penguins (her name is Gwyn and that is how she explains to people how to pronounce her name correctly, not Gwen), I figured I'd use Meljen's Penguin's Little Letter image to go with it. This will fit her challenge "Anything Goes" so I'll enter it there too ;- ) The images were colored in Photoshop. The black card stock is Core'dinations Black Magic and is embossed with Sizzix's snowflakes. I cut the hole with Martha's circle cutter. I set up the words and the heart on the Gypsy. The letters, except for birthday, are from the Cricut Plantin Schoolbook cartridge and "birthday" is an element from the Cricut Sweet Treats cartridge. The heart was cut from card stock from the Peppermint Forest pack.

front

     I wanted the inside of the card to have a surprise, so that is where the snow globe image can be seen. The sentiment is my own, done in Print Shop. The fonts are LD dabble from Lettering Delights,  Kauffman (the script) and wm Christmas3 for the  skating penguin. You can get it as a freebie here. I added glitter pen to the base of the snow globe and Martha Stewart fine crystal glitter to the snow at the base of the penguin.

 inside card

close-up of image inside card

     This would also make a nice Valentine card. Please leave a comment, because I love to hear from you.  I'm also entering this into the challenge at Going Buggy here for grey (black)/ red/ white. Read the next post for the challenge from The Outlawz.

Monday, November 14, 2011

We're off the Hook

     Today's card is for my friend's, whose birthday card was posted the post before last, her middle daughter's birthday, who was 27 on Sunday. Due to the Veteran's Day holiday there was no mail and the card was going to be late, rats! I decided to go with the telephone card from the Cricut cartridge, Wild Card called Hello ' cuz phones just seemed appropriate (it's so hard for me to stop thinking of her girls as teens, Yikes! though I know they aren't any more.)   All of the cuts are from the the cartridge. except for the little piece that stops the dial, when you are dialing. I free hand cut that from a metallic scrap. The phone itself was cut twice (I used the gypsy so I could position the second image with the card part of the cut hanging off of the mat, so it would just cut the handset - you could have just placed you paper that way basically.) I popped up the handset of the second cut and also the dial. I used a clear glitter pen to write all of the numbers except for the 2 and 7 which I wrote in red glitter pen, since that is her age. There is a sentiment cut that says "Talk of the Town," so I adapted that by writing it in white gel pen on the handset. There is a hole in the center of the dial when it cuts, that goes through to the inside. I lined up my sentiment to have a stamped heart show through (lining this up  in the sentiment was the hardest part.) I used ribbon wrapped around a pencil and stiffened with Mod Podge for the telephone cord.


     The paper on the inside is fro Paper Studio. The shape of the sentiment had to accommodate the shape of the phone. The fonts are LD Typeset and LD Wedding from Lettering Delights. I have an affiliate link on the side bar of my blog that will take you to their site.


     For those of us who are older and curious, the phrase "off the hook" means fresh, new.  I like to be educational ;- ) I'm not sure how I knew that, but it's some of the trivia that fills up my limited brain capacity and keeps me from knowing important things, like what I did last week and important words that I need when I speak.

I also threw together (and that's pretty literally the truth) a few thank-you, for the people that covered for us, with the teens and brought meals, after my husband came home from the hospital. They're so not works of art, but I will show them because I think they will inspire your creativity, in that, you just need scraps and you can do "quickie" Thank-yous, though, you might want to make them a bit nicer than mine. They are about 3 by 3 1/2 or so, though it depended on the scraps I worked with.


This used a piece of punched border that mis-punched, but I kept and trimmed the good part.


This was for our friend first, Pastor second (it's a second career for him and our sons went to school together.) He covered the last hour of my teens (his twin girls are 2 of them) and of course visited at the hospital.


This was the inside. The stamps are from Clear Dollar stamps, Church Chatter.


Again, just simple with tone on tone background stamps, an accent stamp, sentiment and scraps.


Wonderful sentiments from Clear Dollar Stamps. They are having a sale (40% off until the 19th.) I get nothing for this ad ;- ) And why was I rushing so? because I had to get ready for my 11 hours of cookie baking at a friends. Whew! That's a lot of baking. Here's a few photos to make you hungry.


     Hope your week and your creativity is really off the hook ;- ) Thanks for coming by and please leave a comment. They really do make my day or night.

Thursday, October 27, 2011

     Phew, all 14 cards for my college students are done ;- ) My sofa is covered in glitter and snippets of paper, ha ha, but 5 made the mail and the others are stamped (1 awaiting a mailbox number.) I believe last year when I originally CASEed the one from Creating in Carolina I did them one at a time on the Expression. This year, I decided to move her SVG file onto separate layers so I could cut multiple of each item at 1 time. Here is the link to Cely's original post with her file. I made the card an A2 which makes the mouthes kind of small, so I thought I'd gotten rid of them all, but it still did the cut outs on the pumpkin. (Last year the pumpkin face was drawn in, no time for correcting mistakes this year. I'm down to the wire!)  I used Diamond Lace sickles on the moon, gel pens on the eyes, Crayola Pip Squeak glitter for the pumpkin mouth and Divine Swirls to emboss the background.


     The poem (which I showed on an earlier post) was one I found and modified. These are mostly students (trying not to call them kids ;- ) from my Church, who also had attended our K-8 Lutheran School, so I took the witch out of the poem. Yes, I know there is a ghost on the card, but he isn't doing sacrifices in the local forest preserves! You have to draw a line somewhere. Fonts are Lucinda Blackletter and LD Typset (the latter from Lettering Delights.)


     The card for my group that got this one last year, is the one that I teased you with. It is from... the Wild Card cartridge. It is cut at 3.75 inches on the Expression. I used my Gypsy, because the way Cricut designed it, the orange layer is the same as the black layer and you cut the square off and just use the pumpkin part of the cut. Too wasteful for me, so I used the Gypsy to overlay the cut, putting the next pumpkin on top of where the square would cut, continually overlapping the cards until the mat was full. This way I didn't waste so much paper. What was I going to do with a bunch of 3 3/4 inch squares of black paper anyway? I used spray glue on the "Boo" elements and then sprinkled Martha Stewart glitter on them. I colored in the eyes and mouth with yellow glitter gel pen.


     On the inside, I wrote with white gel pen. Font, debbie scribble, hee hee.

    
     There was also and envelope available with a liner. At first, not knowing the mailing code I thought I could use it. I made my son's in black however, because it's Family Weekend and I thought I'd just sneak his onto his desk. Later realizing my error (somewhere along the way, when my better judgement kicked in about mail codes) I decided that I would put the cute, small, decorative envelope into a normal A2 size envelope for mailing everyone's cards. On the white ones, I just went over the pumpkin with Marmalade Distress Ink.


     Here is the whole bunch, done, just before I noticed I only had 6 A2 envelopes left in the house and still had to call and get updated addresses for the students from last year and addresses for some of them for this year :- 0

Should have set them up better, would have if there was TIME! ;- )

     Thanks for stopping by and listening to my tale of woe. Hope you have a great weekend. Still so much to do before my husband's surgery and he's out of commission for at least 4 weeks. Please leave a comment, because they mean so much to me. It will be a great weekend, because I'll be seeing my son!

Tuesday, October 25, 2011

Finishing in the past and beginning the new.

     Well, I have a couple of things to cover today. Who'd of thought ;- ) First, you'll recognize this card. It was made for my sister-in-law and the progressive challenge at Crafter's Digital Art Center. You'll find the info on it here.


     However, at the time I hadn't finished the inside.  I thought you'd like it. I found an image by googling woman screaming and vintage.  If you can't find it and are interested, drop me a line and I'll send it to you. I only used a part of it and I used a black gel pen to make a frame. The font is a freebie called Greenfuz and the line element is from Print Shop.

Kind of a fun surprise ;- )

     The next card is for some friends, who have been trying, unsuccessfully for a number of years, to have a baby. Recently, they were out of town at a family wedding when they got a call that they needed to get to the hospital immediately, there was a baby waiting for them. The attended the wedding and drove through the night and are happily, now a family ;- ) This is the card I made for them. I used my Cricut Imagine and the Nursery Tales cart to make the background paper and the layered images. However, I used my Gypsy to make the shaped card from a shape from the Storybook cart with my Expression. I then cut the same shape using the paper I had made with the Imagine, on the Expression 1/4 smaller, to use as the background paper.  (Got all that ? Good! or are you yelling Equipment Overload!) I used glitter pen on the dragonfly wings and gel pens on the frog and grasses. What are the chances of sticking you hand in wet gel pen? In my case 100% I added Martha Stewart Brown Flockingto the cattail and wiggle eyes to the frog, as well. The sentiment is my own. The font is SNF Classy Charm from Scrap N Fonts cut with oval nestabilities.


You can sort of see the details. Will be getting my camera back soon, thankfully.

     In order to do the sentiment, I printed a coordinating 3 in. by 3 in. square of pattern paper. I attached that to a piece of printer paper. Before running it through, I did a test run, to make sure I knew where my sentiment would print and which way to put the paper in. Now, I accept no liability for your printer, if you try this ;- ) I try not to let my husband know that I'm doing this >.< I set it up so it would print in the upper corner and taped the paper in the upper corner so the tape was on the back (securely.)


      I cut a second shape for the inside and using the same SNF Classy Charm font, on plain printer paper,  I added the inside sentiment. I also used DB Frilly Words from Lettering Delights to add the words near the center and the element in the center is from Print Shop. I embellished it with more layer images from the Imagine Nursery Tales cart. On this card, I've obscured the name to protect the innocent ;- )

    
     I also always sign the back of my cards with a matching ink and on some I also add an embellishment.


     I thought I'd give you a sneak peak at the beginning of the cards I'm making for the college students. Do you know what Cricut cartridge I'm using? I'm working on the Gypsy to move the multiple images around to save paper.


     Thanks for stopping by and spending some time with me. It means so much to me ;- ) Hope your week is filled with creative time, new inspirations, and blessings. Please take a moment to leave a comment. Thanks!

Thursday, October 20, 2011

Holding on.

     I have 2 small things to show today, but I got so much less done than I'd hoped. In my studio today, I worked on making a holder for the note cards I made for my friend, Susan. Yes, I know I made those a long time ago, but we haven't connected since and tomorrow we are finally going to lunch together, so, just in time, I'm finally making the note card holder and envelopes. I used Cricut's Tags, Bags, Boxes and More to cut the shopping bag holder. I used the Gypsy set to weld, so that it wouldn't cut tick marks that show you where to score the bag. I figured I could handle that and not have the rough edges those cut marks leave. When I originally made the notecards, I made an extra set of the image and mats as well as an extra border to use on the holder, so that was all done. Below is also a photo of the set of note cards. Here is a direct link to the post if you missed it. The image is by Glitterbabe and was for CDAC's Progressive Challenge.


     See, nice and quick, but at this point the migraine beast won out and I surrendered. Earlier in the day however, I had gone to Archiver and did their Make and Take, which this week was featuring Tim Holtz products.  Yes, I'm still missing my camera. Sorry about the photo quality. It used stamps, embossing (lined up over the stamp), diecuts, distress inks, and distress stickles (which were still wet when I stuck my finger in the ooey, gooey eye socket of the skull - just trying to add some halloween ambience ;- )


     You'd of thought I'd have gotten a lot more accomplished this week, considering my husband's been out-of -town and I haven't been out lunching (until tomorrow - that is.) Thanks for stopping by today. Please leave a comment and I'll feel this is a more productive day, ha ha.  Have a inspired day!

Friday, September 30, 2011

Bowl full of Apples!

     For my project in Crafter's Digital Art Center's (CDAC) Progressive Challenge round 3, I used Glitterbabes's image "apple bowl." I colored the image digitally in PhotoShop Elements. I thought a friend of mine, who is a librarian, could use note cards with this image, for volunteers and teachers. I matted the image with peach and black Core'dinations cardstock. I didn't have a punch or Cricut cart with an apple border so I used the A Child's Year cart and took the apple icon and made it a border with my Gypsy by welding multiple apples, until I had enough to cover the 4 inches of my base. The note cards, BTW, are 4inches by 4 inches. I then highlighted the apples on the border with a white gel pen.


     On the inside, I used apple pattern paper, that I'd gotten at Hobby Lobby, but I'm afraid I forgot to write down whose it is, before  using it all >.< I then digitally made a place for her to write that is 3.5 inches by 3.5 inches. I used a free brush set called School Dayz Sketches Brushes by redheadstock which I found on devionArt Here.


     I still need to make envelopes and a box to hold them, but I needed to post this, because the project needed to be posted before the end of the month. Check out the other images and projects here and you can join us for the next round for only $1,which gets you the next set of images (they are free as long as you continue with the challenges.) You can find the info on how the Challenge works at the link above as well.

     Thanks for stopping by today. Please leave a comment or ask any questions you might have. The nice thing about coloring an image digitally is that you can easily make multiple copies quickly (and correct mistakes ;- ) Have a weekend filled with special moments.