Showing posts with label DCWV. Show all posts

Monday, March 12, 2012

Cocoa cards on their way to college ;- )

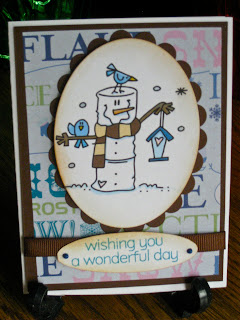
     Well, the cards have been on their way for a few days now, but my husband believes in sharing and shared his nasty cold virus with me (which may have some home from college in the first place with our son, but he doesn't usually get very sick.) There are 14 cards in total, but only 10 were still here for there photo shoot ;- ) The cards for the guys all use the same pattern paper, while I use a few different pattern papers on the ones for the gals.

     The image is from Bugaboo Digi Stamp and I won it during a blog hop from Cely (Creating in Carolina) back during Christmas in July. I colored it digitally, which sure makes making multiples easy ;- ) and cut them out with the large oval nestability. The pattern papers are all from DCWV Holiday Collection Christmas Stack. The mats are a Bazzil paper from Archiver. The ribbon was scavenged from boxes of Godiva Chocolates over many years ;- ) (Yea! Hubby) I used Viva Decor Pearl Pens, to add the pearl dots, on the sentiment, which is from Hero Arts Big Hugs (stamped with Tumbled Glass Distress Ink and clear embossed) and also Sickles on the hearts for the gal cards, but only Stardust pens by Sakura to the hearts on the guy cards. Oh, and of course there is inking! The oval for the sentiment was cut on the Cricut using the Gypsy and Accent Essentials, after making sure the keep proportions was unchecked. A friend came over the first day and helped me cut our all of the images, mats, paper and card bases, so a special shout-out to Diana for her help!!!! Her daughter will get her card this week ;- )



     On the first cards, which went out before I took photos, I used pattern paper on the inside, but realized that the sentiment inside covered so much, that it was a waste, so I then just used more of the Bazzil card stock to mat the sentiment. The fonts in the sentiment are LD Penelope (from Lettering Delights) and Kingthings Christmas (the snowy font, available as a freebie Here or at dafont, but dafont was down for maintenance when I went to link to them.) I had added a post-it to the cocoa, because it required the addition of milk instead of water and I wanted to be sure they noticed that. I embossed a stamp from Inkadinkadoo's Warm Holiday Wishes with silver glitter finish.


     Sorry, about the photo, but the sun came out from behind the clouds and I usually photo after the sun is well past this window, but they needed to get into their envelopes. I created eveloboxes with The Ultimate Crafter's Companion for each of these cards (sorry, I didn't photo them), so there was enough room for them to fit. My son said his college treated his card like a package and sent him an e-mail when it arrived and he had to pick it up from the package person.

     Hope your week is full of inspiration and warm weather. We are expecting great weather here ;- ) Thanks for stopping by and I'd appreciating hearing from you! Your comments mean so much to me. Feel free to ask me any questions too!

Wednesday, January 25, 2012

A Simple Gift Bag.

     I needed to make a gift bag for a gift (yes, it's a Christmas gift, still - it was something that was ordered and didn't come until after my friend and I got our families together for Christmas - OK - don't you judge me ;- ) and the Cricut didn't have a file for one that was large enough, so I checked the Internet and this was what I came up with. It's really simple, but since I looked it up, I thought I'd share it with you and maybe save you some time. I found this template from the About.com people and you can find all of their directions here. They have a template there that you can print out and it looks like this.

     It shows the measurements in units, so that you can make the back about any size. This will make the front and back twice the size as the sides. (You can click on the image to enlarge it.) Since I wanted to make as large a bag as I could from a 12 inch sheet of card stock 2 inches was my basic unit. Now you may be saying, "Hey that doesn't divide out right!" Probably not, I don't do that kind of math in my head either, I would have just believed you, but it doesn't, because you need to leave that edge that is in grey in order to glue it. So, my sides are 2 inches (because I wanted the extra ease on the sides) and the front and back are 3 3/4 and the extra 1/2 inch is in the grey area used to glue it together. I just made that up to make the numbers work (it made more sense to me than have fractions all over the place and used the whole sheet of paper across.) I scored it on my Martha Stewart score board. It was scored up 2 inches from the bottom as well, in order to make the  bottom flaps and that is how far up you cut from the bottom. I didn't use the whole sheets height, because my gift isn't that tall. I didn't take a photo of the scored bag, but here is a photo of the part that I had cut off of the top with the score marks.


     The bag was made with DCWV's Holiday Collection Christmas Stack from last year. I used Terrifically Tacky tape down the side seam first (the smallest area on the right) first. Now remember, on the actual bag I cut on the score lines for 2 inches up on the bottom, to make my flaps. (the template never tells you what to do with the part in the grey are here. I cut it off.) I then folded them in to form the flaps, first the smaller side flaps and the the larger flaps and used the Terrifically Tacky Tape from Provo Craft to hold them together.


     Now from here you can decorate your bag any way you want. If you used plain paper and had wanted to stamp it, of course you would have done that while it was still flat ;- ) I thought about add some poinsettias that I had meant to make for Christmas, but didn't (don't judge...) but they wouldn't have gone with the paper I ended up using. In the end I decided jus to add a handle. I didn't have an eyelets that matched, but I knew the gift is light, so I just punched holes in the front and back of the bag and threaded some ribbon through and then knotted the ribbon.


     To keep the ribbon from twisting I added some discreet tape on the inside ;- )


     So, just switch this out with some valentine paper and fill it up for you sweetie <3 Thanks for stopping by and not judging me today. Please leave a comment before you rush on with your day. I really appreciate hearing from you! I'll be leaving christmas behind now!!!

Saturday, December 17, 2011

Elves have been sighted ;- )

     Elves have been getting busy. One is working on the tree and the college elf has been spraying glitter for the Christmas cards and has learned to use a corner rounder ;- ) Amazing growth, that college brings, ha ha. However, today's item, is still not our Christmas card. Instead, it is a square tag that I made using the image from the Freebie Challenge at The Outlaws due, surprise, today!

     The image is from Anne's Digital Design by Anne Fenton. You can find her blog here, where she often offers some great freebies. I colored it digitally in PhotoShop. The red cardstock is from Core'dinattions and the pattern paper is from DCWV Holiday Christmas Stack. I just happened to pick up the ribbon this week from Michael's this week, on sale. The sentiment is from Inkadinkado and I embossed it with Kaleidoscope embossing powder.  I went over the sign with a glitter gel pen and added Diamond Glaze to the berries (it appears it's not dry >.<) A nice, very simple tag, where you can put the To: and From: info on the back.


     I'd like to go back to cutting down our tree next year. Just shopping for it, as we have the past couple of years (partly due to the surgeries) causes us to go out for it later and the pickings are slimmer and I don't get to enjoy looking at it as much.  Hope your holiday preparations are coming along on schedule. Thanks for taking the time to stop by. Please leave a comment before you dash off. I really appreciate them. Have a holly, jolly weekend ;- )

Wednesday, December 14, 2011

Still no elves in sight, but here is a card ;- )

     Today's card uses the image for the Progressive Challenge at the Crafter's Digital Art Center. The image is by Doodle Pantry.  I colored it digitally in PhotoShop. I've been thinking I will do a tutorial on coloring images in PhotoShop some time soon. Maybe after the holidays, if people are interested ;- ) The font I used for the sentiment is LD Leaves from Lettering Delights. I have an affiliate link to their site on the side bar to the right. I plan on completing the card as a gift card holder inside, as soon as I decide to whom it is going and have purchased the gift card. The papers are DCWV's Lemon Flower Stack. Love the glittery paper in this stack ;- ) The flower in her hair, is a button I picked up at JoAnn's.


     Well, this is a short one because I, like all of you, am busy with Christmas stuff and am trying to make Christmas cards (a first time for me and... HAPPY DANCE... my son finish his finals tomorrow, so is coming home from college, Yipppeee!

     Thanks for flying by during all you holiday preparations. Please leave a comment before you go, they really mean so much to me. Have a super creative rest of the week!

Saturday, December 3, 2011

Tag, you're it ;- )

     Well, for the Creative Freebie Challenge at The Outlawz, I decided to due another tag, especially with the Christmas Party being tomorrow. It would have been done yesterday, except for needing to let the glitter glue dry. Then today, a piece went missing :- p Kind of figures, doesn't it ;- ) So after searching for way too long, I remembered that the DCWV Christmas Stack (which all of the papers are from) has another sheet with the element on it and just re-did it. The image is from Sandi Huggett and you can find Sandi's work at Sandi's Samples here. I used Diamond Stickles on the candy canes, Sparkly Fluff on the top, heel and toe of the stocking,  Perfect Pearls on the body of the stocking. I applied a line of Crayola Pip Squeak glitter on the line between the  papers and glitter gel pen to the gift box that was cut out from the DCWV paper. There is also white gel pen added to the NOEL. The stocking image was printed twice and popped up. I'm not sure whose the holographic snowflakes are, because the company name is cut off of the package > . >


     I was out decorating for the birds, ha ha ;- ) and ... 


     The sun is setting way, way to early and it's way to far south :- ( 


     Well, back to work for me. Thanks for dropping in. Drop in over at the Outlawz and join the next round of the Freebie Challenge. Check it out here. Please leave a comment before you go. It means so much to me to hear from you ;- ) Have a wonderful weekend!

Sunday, October 30, 2011

Sweet Birthday.

     This card is made for my Aunt. I used one of the images from the Crafter's Digital Art Center's (CDAC) Progressive Challenge. We're in the 5th round and this image is by SSBS Design.  This post is going to be short, because I have to be up at 4am to get my husband to the hospital for his surgery and I just got back from driving my sone back to college. I colored the image in PhotoShop using a few patterns on the basket, the gingerbread men and her dress and headband. You really can only see the one on her headband after the image was sized to fit my card, though the gingerbread men look a bit more cookie-like ;- ) I mixed and swirled colors to make her hair. There is Diamond Glaze on her shoe to make it look like patent leather and glitter gel pen on the gingerbread men. I used Broken China Distress Ink. The papers are DCWV Holiday Collection Christmas Stack from last year. The gems are from Hero Arts as is the sentiment and the flower from Archiver. If I had more time, I probably would have cut out more gingerbread men and popped them up (I may still her birthday is in December, but the challenge is due today ;- ) There is no inside sentiment yet, so when that is done, we'll probably review this card, LOL.
Maybe I'll remember it.


     Thanks for stopping by and please leave a comment. Thank-you so much to those of you who do. they really are much appreciated ;- )

Sunday, April 17, 2011

2nd of 3 designs of altered items.

     Today's post, as you can tell from the title, isn't a card, but the next of 3 designs of of altered items. I made 2 items for my friend's daughters for Christmas and promised the final item for Easter. I showed the first design on my post here. This one is the same item, a junior legal pad, only I used paper from DCWV's Linen Closet's 8x8 pad and also, Bazzil's Swimming Pool.  I really like Linen Closet. The font is from Cricut's Storybook Cartridge.


     Below are the other items in the set, that I made for Christmas. Sorry, that the photo isn't very good, but I forgot to take a photo (well, I finished them just before we left to go there) and my DH took one there after the gifts were opened, with his cell phone.


     These are a Post-it note holder and a calendar that I found at Michael's for a $1 and recovered, as well as I pen that I matched to the set. The calendar was actually very attractive inside. It was nicer, than some more expensive ones, I found at office supply stores. The lighter blue papers are the same color as the paper in the accent on the "C", that's how bad the photo is ;- )

     Hope you had a great Palm Sunday. We had some snow and ice balls yesterday, YUK! And some areas are going to see snow tonight >.< , but it won't last. It was 50 and sunny today. I am tired of it though and wish the real spring would please stand up! Thanks for stopping by and sharing a few moments with me. As always, your comments are greatly appreciated. Have a wonderful week. 

Thursday, April 7, 2011

On the inside...

      Well, today I promised you the inside of the card I showed you on yesterday's post. The image and the font are from Birthday Bash. The sentiment is made to go with the cupcake and is the shift key for the cupcake image on the Birthday Bash cartridge. I re-cut the flame of the cupcake and replaced the green part. The 3 was the leftover cutout from cutting the balloon on the front.  I used divine swirls embossing on the cupcake. Now, here it is.


     I mentioned getting Lemon Flowers Stack by DCWV yesterday, but I hadn't taken any pictures. Today I thought I show you this lovely sparkly paper. Love the brightness!

Each print comes in different colors. For example the yellow one will also come in green and vice versa. The black and grey comes in a yellow and tan. The first, third and fifth (in the row above are glittered.) Click the photos to see them larger.

There are 4x6 mat stacks too.

This one has the same patterns only the prints are smaller to match the 4x6 size.

These are nicely textured, metallic or glittered. Again I found them for 50% off at JoAnn's.

     Thanks for stopping by today. Have a super weekend. We're expecting very warm temperatures here, of course that means storms as well. Please leave a comment if you have time, I really appreciate hearing from you and knowing you were here.


Yes, it's another guy card.

     Well, this guy is little. I remembered later, that I do have a little girl birthday first. Darn, it would have been a nice change of pace ;- ) This little ones Grandmother, told me he likes penguins, so I used Cricut's Create a Critter for the Penguin and the Balloon, using the Gypsy to add the number 3 to the balloon. The font, the sentiment and card base come from Birthday Bash. I too, was frustrated and annoyed after reading Provo Crafts "Official Statement" on their lawsuits today. Unfortunately, I have too much invested in the Cricut et. al. and not enough money to switch horses at this point, so I have to stick with the pony I'm riding. I don't plan on upgrading my Expression, though, and will continue on with SCAL, because that was a major factor in my purchase decision.  OK, back to the card now...

 
     What does the inside look like? Well, you'll have to wait to tomorrow to see. Why? Because it's not finished yet, he he! I did get some great paper at JoAnn's today. The had DCWV on sale for 50% off and I picked up Lemon Flowers (the 12 X12 and both mat stacks). Archiver also has had these new stamps and honeycomb papers that are really neat. See the line here. I had to put my name on the list and my stamp came in today and I had a 30% off coupon. I've heard that they've run out at many of their stores. I hope to use them soon.

     Thanks for stopping by and please leave a comment if you have the time. I really appreciate them all.
Have a blessed and inspired day!

Thursday, March 24, 2011

Rocking the guy card!

     Before I give in to the call of more flowers, I needed to do another masculine card. This one is for a 22 year old. I can't believe how fast they all grow up. From birth to 22 in a blink or two. Anyway, this friend's son, had played in their Church Praise Band. I decided to use the star shaped-card, from Cricut's Birthday Bash. It's from the card function on the image of the fox playing the guitar (4th image). I used the star and a modified version of the words (just a minor trim), from that page and the font from that cart as well. I decided that a cooler guitar was needed though, so I used the guitar from the Indie Art Solutions free upload to the Gypsy. I hid the inside cuts and then used the Cri-Kits metallic green gel pen to draw the details in.


     On the inside, I used a digital sentiment with the Lettering Delights font SNF Jester Fool.  Don't forget, they are still having their Dollar Days at Lettering Delights. There's a link in my right margin. The pattern papers are DCWV's  Generation Tech. I think I'll find a lot of uses for this paper pack. (I'll probably get a 2nd.) The metallic paper is from AC Cardstock.


     What would I do differently? Looking at it, I'm thinking of adding some bling to the pegs (tuning pegs) at the top of the guitar. I wish I'd come up with a different way to do the sentiment. I was kind of going for an inverted triangle, but it didn't fit. (Only in my mind.) Maybe if I'd used a smaller font size. Then maybe cut that with zig zag scissors? Maybe I'll find an embellishment to go to the left of the star, in the blue area. I really like how the front turned out though.  The bit of bling for more dimension would be about it (the star and the guitar and the letters that need it are already popped up.)

     Now, maybe I can play with flowers ;- ) Penny Duncan, added a tutorial and SVG file to her blog here, on  Easter lilies. I also found  one on roses here. So click on the links if you are interested and make some summer inside. Have a great and blessed rest of the week. Your comments are more appreciated than you could know. Thanks for stopping by.

Thursday, February 10, 2011

Getting on with the Valentines

     Well, despite some shopping at Hobby Lobby and JoAnne's, I was still able to finish my DS's Valentine card. Very tricky this year, because he's in collage and likes to put up his cards on his bulletin board, so I had to keep it non-mushy and non-embaressing, as well as mature ;- ) That's an awful lot to ask of a mom! So I decided, no pink or red on the outside. I have picked up a lot of cool, free Photoshop brushes, at a few sites so I took some time yesterday, just going over them. One, I liked for my son, was from a site called photoshopfreebrushes.com. Who'd of guessed. I applied a few effect to it such as, chrome and wow chrome beveled edge to make it look metallic. I had the original layer on top and made that layer partly transparent for the effects to show. I also add one of the texture backgrounds that comes with Photoshop Elements. I then printed this and used it as the top layer of the card. On this I attached the word Hugs cut from the Smiley Cards cart on the Gypsy. It was cut at 1 1/4 inches from blue DCWV paper. I bowed it slightly and attached it with shiny heart brads and silver dull brads from Spare Parts. I also added faux stitching with a black glaze pen.


     On the inside, I started with a black mat. I made the sentiment digitally using the font Tabitha, which comes on Macintosh computers. After that, I remembered an idea I had while shopping, to put a list of the reasons we love him, in his card. So, I decided to make a tag and find a way to squeeze that in too. I stamped the tag with a clear stamp by Autumn Leaves called Hand Drawn Journaling Panels by Katie Pertiet with Big and Bossy and clear embossing powder. I then rubbed rubbed Ranger's Broken China ink over it and cleaned the excess off of the embossed areas. I wrote on it with a black glaze pen. I made 2 hearts out of Core'dinations Magic Paper that was black with a red core. I cut the hearts at 1 inch with the Expression using Plantin Schoolbook using the Roly Poly feature key. I then dry embossed it with Swiss Dots and sanded it so the red core would show. I used one of the hearts to help hold the tag on the card, but also attached the tag with removable tape, so he can take the tag off and save it anywhere he wants.

     What would I change? I would have planned for the tag better to begin with and moved the writing  over inside the card. Or... maybe I would have planned a pocket in the card for the tag to fit in and the it could be slipped out. Though I do like it as an element in the card, maybe I'll shorten the twine a bit yet and attach the twine across the top. The inside isn't quite right, but I like the card. I might have been able to make the digital writing narrower and that would have balanced the tag better. Ah, that sounds better.
Well, thanks again for visiting. Please give me your feedback. I'd love to hear from you.

Wednesday, January 19, 2011

Birthday card for a Friend

     Today's card is a more typical card for me. It's for my friend Gywn. Typically when I make a card for a friend I try to tie it to that person. I don't make many general cards. In this case the image will be a penguin, because Gwyn has often considered that her symbol. She uses the word penguin to tell people how to pronounce her name, so that they don't mispronounce it Gwen. So it's convenient that she has a January birthday. Let me show you the card and then I'll tell you how I made it.


     I used the penguin from the Cricut Create A Critter cartridge. I cut the penguin with the layers at
2 1/4 inches on my Cricut Expression. I used the Gypsy to lay the whole card out first to make sure the words would fit in the space of an A2 card. After I had all of the penguin layers set out, I choose the phrase, "chillin'" from the same cartridge. I sized it at 2.5 inches wide and it was cut out of the DCWV Holiday Collection Christmas Stack. I realized it would be too similar to the background paper and since it was already the shadow cut, I made a second cut out of black and sized it 1.45 inches high. The original cut was 1.35 inches high, so I went up one tenth of an inch to make  the background cut. Due to the fact that the cuts are curved, it's not really a shadow, but I placed it so that it shadows as if the light were below it. I used the Cricut cart Lyrical Letters to type out "on your Birthday" at 1 inch high on the Gypsy and then welded the letters of each word except for the B. I tried the letters smaller, but the smaller letters didn't cut well, esp. welded. The orange cardstock is from Cord'inations. the rest was scraps, so I'm not sure. I used a pearl gem to dot the "i".  I used the Cuttlebug Divine Swirls folder to emboss the background layer with my Big Shot. I embellished the "chillin'" with Diamond Stickles, even adding icicles. here is a close-up.


     I had meant to try the icicles before the card was put together, in case they didn't work out, but as usual, I forgot my smart idea and had the whole thing put together first. Still, I tried my icicle idea and was happy with the way they turned out. On the inside, I matted 2 pieces of patterned paper from DCWV Holiday Collection Christmas Stack  (one at 5 1/4 x 4 and the other 5 X 3 3/4) and added the birthday wishes which I had done on my computer using Print Shop. The fonts I used were Snowcaps by Simply the Best Fonts and SNF Jester Play by ScrapNfonts. Snowcaps is a free font and SNF Jester Play is currently $5, but they often have sales and I think I got it for $1 or $2. I then added  a cute penguin dimensional sticker from Recollections and an epoxy bubble icon from Craft Essentials. What would I have done different? I had meant to tear some white paper to look like a snowy base for the penguin on the front to stand on to ground him, but forgot. I probably would have used Stickles on that as well. Otherwise, I'm pretty happy with the way this card turned out.
     I've been asked by a friend to do a card for a 100th birthday. Time to put my thinking cap on. If anyone has any ideas, please chime in. Thanks for looking in.