
 Posts
Posts


Phew, all 14 cards for my college students are done ;- ) My sofa is covered in glitter and snippets of paper, ha ha, but 5 made the mail and the others are stamped (1 awaiting a mailbox number.) I believe last year when I originally CASEed the one from Creating in Carolina I did them one at a time on the Expression. This year, I decided to move her SVG file onto separate layers so I could cut multiple of each item at 1 time. Here is the link to Cely's original post with her file. I made the card an A2 which makes the mouthes kind of small, so I thought I'd gotten rid of them all, but it still did the cut outs on the pumpkin. (Last year the pumpkin face was drawn in, no time for correcting mistakes this year. I'm down to the wire!) I used Diamond Lace sickles on the moon, gel pens on the eyes, Crayola Pip Squeak glitter for the pumpkin mouth and Divine Swirls to emboss the background.

The poem (which I showed on an earlier post) was one I found and modified. These are mostly students (trying not to call them kids ;- ) from my Church, who also had attended our K-8 Lutheran School, so I took the witch out of the poem. Yes, I know there is a ghost on the card, but he isn't doing sacrifices in the local forest preserves! You have to draw a line somewhere. Fonts are Lucinda Blackletter and LD Typset (the latter from Lettering Delights.)

The card for my group that got this one last year, is the one that I teased you with. It is from... the Wild Card cartridge. It is cut at 3.75 inches on the Expression. I used my Gypsy, because the way Cricut designed it, the orange layer is the same as the black layer and you cut the square off and just use the pumpkin part of the cut. Too wasteful for me, so I used the Gypsy to overlay the cut, putting the next pumpkin on top of where the square would cut, continually overlapping the cards until the mat was full. This way I didn't waste so much paper. What was I going to do with a bunch of 3 3/4 inch squares of black paper anyway? I used spray glue on the "Boo" elements and then sprinkled Martha Stewart glitter on them. I colored in the eyes and mouth with yellow glitter gel pen.

On the inside, I wrote with white gel pen. Font, debbie scribble, hee hee.

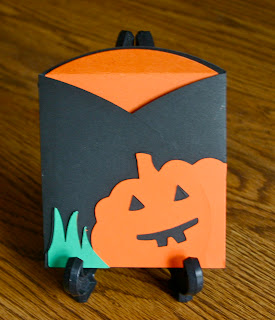
There was also and envelope available with a liner. At first, not knowing the mailing code I thought I could use it. I made my son's in black however, because it's Family Weekend and I thought I'd just sneak his onto his desk. Later realizing my error (somewhere along the way, when my better judgement kicked in about mail codes) I decided that I would put the cute, small, decorative envelope into a normal A2 size envelope for mailing everyone's cards. On the white ones, I just went over the pumpkin with Marmalade Distress Ink.

Here is the whole bunch, done, just before I noticed I only had 6 A2 envelopes left in the house and still had to call and get updated addresses for the students from last year and addresses for some of them for this year :- 0


The poem (which I showed on an earlier post) was one I found and modified. These are mostly students (trying not to call them kids ;- ) from my Church, who also had attended our K-8 Lutheran School, so I took the witch out of the poem. Yes, I know there is a ghost on the card, but he isn't doing sacrifices in the local forest preserves! You have to draw a line somewhere. Fonts are Lucinda Blackletter and LD Typset (the latter from Lettering Delights.)

The card for my group that got this one last year, is the one that I teased you with. It is from... the Wild Card cartridge. It is cut at 3.75 inches on the Expression. I used my Gypsy, because the way Cricut designed it, the orange layer is the same as the black layer and you cut the square off and just use the pumpkin part of the cut. Too wasteful for me, so I used the Gypsy to overlay the cut, putting the next pumpkin on top of where the square would cut, continually overlapping the cards until the mat was full. This way I didn't waste so much paper. What was I going to do with a bunch of 3 3/4 inch squares of black paper anyway? I used spray glue on the "Boo" elements and then sprinkled Martha Stewart glitter on them. I colored in the eyes and mouth with yellow glitter gel pen.

On the inside, I wrote with white gel pen. Font, debbie scribble, hee hee.

There was also and envelope available with a liner. At first, not knowing the mailing code I thought I could use it. I made my son's in black however, because it's Family Weekend and I thought I'd just sneak his onto his desk. Later realizing my error (somewhere along the way, when my better judgement kicked in about mail codes) I decided that I would put the cute, small, decorative envelope into a normal A2 size envelope for mailing everyone's cards. On the white ones, I just went over the pumpkin with Marmalade Distress Ink.


Here is the whole bunch, done, just before I noticed I only had 6 A2 envelopes left in the house and still had to call and get updated addresses for the students from last year and addresses for some of them for this year :- 0

Should have set them up better, would have if there was TIME! ;- )
Thanks for stopping by and listening to my tale of woe. Hope you have a great weekend. Still so much to do before my husband's surgery and he's out of commission for at least 4 weeks. Please leave a comment, because they mean so much to me. It will be a great weekend, because I'll be seeing my son!


